Showing posts with label Camera Settings. Show all posts

Sunday, August 30, 2020

Photography Article Fall Round Up|Photography Artist Statement

Just in time for Thanksgiving, it's the Fall Round Up: your one-stop spot for a look back at this fall's posts. Catch up on the previous round ups here:Spring and Summer.

Yes, Go Chasing Waterfalls

Musings:

  • Photography Is ... What is photography for you? Some thoughts about the importance of timing, patience, and luck.
  • Boost Your Photography: Set a Goal or Challenge - Learn how setting, reviewing, and revising a photography goal or challenge can help move you forward in your photography.
  • Photography Gifts for the Holidays and Where to Order Holiday Photography Gifts - Put your photography to good use this holiday season. Read about the wide variety of ways you can use your images to create memorable gifts for friends and family.
A collage mug is one of many ways you can use your photography for gifts.

For Beginners:

Explanations and overviews geared towards those wanting to get more out of their photography. Many of the 'Tips and Tricks' and 'Inspired Ideas' are also applicable.

  • Aperture and the F-Stop Conundrum - Confused about aperture? This article is the place to start. The rest of this mini-series divides the aperture section into three:What an Aperture of F/1.8 Can Do for You,The Middle Range Apertures: f/8 and f/11, andWhat an Aperture of F/22 Can Do for You.
  • Camera Lenses: What's In a Name? - An overview of camera lens naming conventions and what you need to know when looking for a new lens,Learn Your Lens: the lens itself - All about the functions and features of a lens, and Learn Your Lens: the accessories - Learn which camera lens accessories you need and how to use them.
  • Yes, You Need a 50 mm Lens - Find out why a 50 mm lens is a great upgrade, especially from your kit lens(es), and it's a great steal, priced around $100.
Comparison of changing apertures from the wide, middle, and narrow ends of the spectrum.

Tips and Tricks:

Advice for getting the most of your camera and photography

  • Zooming vs. Cropping: perspective in photography - Understand the differences between zooming vs. your lens, cropping afterwards, and the importance of changing your perspective.
  • Easy Photography Upgrade: get a remote shutter release - Around $6 for a remote can make a big impact in your photography.
  • Shoot a Successful Self-Portrait - Learn how to shoot a better selfie: how to focus and set the scene as well as a variety of ideas to try.
  • Improve your Fall Photography: use a polarizer - Get those blue skies you've always wanted. Learn how to use a circular polarizer.
  • Panning in Photography - Learn how to create panning shots with a frozen main subject and moving background.
  • Thankful ... for Food Photography - A collection of tips and tricks for improving your food photography shots.

Inspired Ideas:

How to make the shot with specific photography ideas

  • 50th Post and Six Month Blogoversary - Count down the Top 5 Most-Viewed Posts of the first 50
  • Make the Shot: Slow Sync Photography - Get a behind-the-scenes explanation of how to create your own ghostly images using the slow sync function of your on-camera flash.
  • Yes, Go Chasing Waterfalls - Suggestions and advice for what to bring and how best to shoot waterfalls with that long, silky water look.
  • Local Tourism: Photograph the Harvest - Find photographic inspiration in your local harvest. Visit a pick-your-own orchard or pumpkin patch.

Travel Photography

  • Photography Collections: start a collection - Consider a collage as a way to display travel memories. Unify your collage by focusing on a specific item or element, like full doors, door knobs, or even hearts.
  • Window on the World - Windows are a unique way of placing the viewer within the frame of your photograph. Consider paying attention to windows when you travel.

Stay Connected:

Don't miss a single post from Boost Your Photography

  • Follow along onFacebook -www.facebook.com/BoostYourPhotography.
  • Follow along onGoogle+ -Boost Your Photography on Google+ (or click the 'Follow' button near the top of the right-hand column.)
  • Follow along onTwitter -@archaeofrog .
  • Sign up to receive each new post by email. (The subscription box is in the right-hand column. Email addresses will never be sold or distributed.)
  • Subscribe using your favorite RSS reader. (Click the 'subscribe now' button in the right-hand column or typewww.boostyourphotography.com into your RSS reader.)

Friday, August 28, 2020

Photography Article Shaped Bokeh|Photography Artist Statement

The first article on this series delivered you to All approximately Bokeh, and this second one will cowl the topic of fashioned bokeh. Shaped bokeh takes the idea of bokeh one step further through remodeling those out-of-focus circles of light into some other shape, with countless possibilities.

How to Create Shaped Bokeh: Supplies

This classic how-to publish for formed bokeh comes from DIY Photography, and it is enormously easy and inexpensive. (For the non-crafty among us, you may now also buy a Bokeh Masters package, created with the aid of them, for $25 USD.)

How to Create Easy Shaped Bokeh | Boost Your Photography

For supplies you may need the following:

  • A piece of black paper (thicker cardstock works best)
  • A rubber band
  • A piece of tape
  • Scissors
  • A 50mm lens

Seriously, that is sincerely it. An x-acto knife is beneficial for making the definitely small cuts, but I did my first few with a ordinary pair of scissors. You may also use a fashioned hollow puncher, if you wish.

The steps, you could basically intuit from looking on the photograph above. Cut out a duration of black cardstock, roll it round your lens to make a tube, and tape it together. Trace around the circumference of your lens/tube. Cut out that circle, adding approximately a half of inch or so all the manner around. Then, cut a chain of notches into the circle (returned to the authentic, traced circle). Fold the notches returned. You can then vicinity the circle over your lens and the tube and stable it in vicinity with a rubber band across the tube and the folded down notches.

Example shapes: superstar, snowflake, and coronary heart

But yes, we skipped the most important step: the shape. First, decide what shape you want for your shaped bokeh filter. For an introductory 50mm kit lens, you can make your shape up about 17mm long. (Here's the article on the math behind that, if you are curious.) Center your shape directly in the middle of the circle (fold the circle in half in two places if you want to easily find the exact center). All sorts of shapes can work, as long as you can easily and neatly cut it out at that small of a size. (The complicated-looking snowflake was cut using an x-acto knife.)

Shooting Shaped Bokeh

Now which you are well-armed together with your formed bokeh-making tube and filter out(s), you're geared up to begin taking pictures. Many of the ideas are the same as while shooting any type of bokeh. You will need to shoot with your lens extensive open (the widest aperture to be had, like f/1.8). You will want to have your challenge fairly near the digicam and the background at least two times as far away. You will need a historical past so as to render massive, circular bokeh, which is why the vacation season is an ideal time for shaped bokeh. Hang up a few strands of lighting fixtures or move stand in front of your neighbor's tree or house, if you choose.

The simplest manner to shoot formed bokeh is to compose your shot earlier than placing the form in front of your lens. A tripod is mainly helpful so that you can consciousness in your subject first and then transfer your lens into manual awareness, so that it will lock the point of interest in place. Then you could positioned the form over your lens, secure the rubber band, and now not have to worry about your camera trying to find focus via the narrow shape.

Keep in mind that your shaped bokeh will grow to be being a great deal smaller than the unique bokeh circles. Unless you're able to reduce your form to precisely the maximum allowable size, you will lose a number of the size based totally on how small you have got made your shape. The handiest compositional distinction between the two pics below is that the shaped bokeh clear out became used for the second one. The distances between the difficulty, the digicam, and the background (a lit Christmas tree) remained the same.

Another issue with using a formed bokeh clear out is that it'll further reduce down on the quantity of mild reaching your sensor. Because you may already be capturing together with your aperture huge open, you may want to use an extended shutter pace or growth the ISO to compensate. (Another purpose a tripod is reachable.) You can also want to don't forget the usage of a flash to better remove darkness from your situation. The background will no longer need the flash, when you consider that it's far already shiny and manufactured from lights. With the Chimay photographs above, the shutter pace improved from 1/eighth of a 2d for the circle bokeh to 2 seconds for the shaped bokeh. No flash became used.

For the snowman shot, under, the digital camera's integrated flash became used to light up the snowman. The standard settings for the shot were ISO 100, f/1.Eight, and six seconds. The bits of formed bokeh snowflakes creeping around the snowman had been a end result of my lack of ability to maintain him perfectly constant for the overall six seconds. A steady challenge (or some thing to preserve your subject consistent) also can be beneficial.

Snowman and a subject of Snow-Bokeh

Experiment with specific distances, each among the camera and the problem and between the situation and the history. The collection of snap shots below demonstrates the impact of moving closer or farther far from the history. Moving toward the historical past will lead to less overlap among your shapes, but you'll have much less of the shapes, as much less lights are on your composition. Moving farther far from the historical past will purpose a lot more overlap of the shapes and there could be plenty more of them.

The two pix above display the effect of transferring the concern (and the aircraft of recognition) in the direction of the digicam. In each pix, the camera and heritage stayed inside the equal location, whilst the plane of attention moved a foot or so in the direction of the camera for the second picture. Moving the plane of recognition that a lot closer to the digital camera additionally led to an increase in the size of the bokeh shapes.

Summary

Shaped bokeh is a a laugh and clean manner to make creative snap shots. There are endless possibilities, and you could effortlessly make new bokeh filters in a remember of mins. What higher way to have a good time and percentage the matters you adore?

Have a favorite formed bokeh shot you've taken? Share it inside the feedback beneath!

Tuesday, August 25, 2020

Photography Article Top 5 Informational Photography Posts on Boost Your Photography|Photography Artist Statement

http://www.boostyourphotography.com/2014/01/top5-aboutphotography.html

This second post in our Top 5 countdown of Top 5 posts will feature the Top 5 Informational Photography Posts from 2013 on Boost Your Photography. (Yesterday's post was The Top 5 Travel Photography Posts of 2013.)  Many of these posts were featured as part of our series geared toward beginners, variously subtitled "Things Experts Forget to Tell You" or "Things that Your Forgot You Had to Learn." While many of these posts are geared towards photographers who are first learning how to use their DSLR camera, even those of us more experienced photographers may find something of value.

#5: Keeping Your Camera and Sensor Clean

http://www.boostyourphotography.com/2013/08/clean-camera.html

Camera protection is a seriously essential, and regularly unnoticed, part of pictures. Your digital camera is continuously exposed to specific situations, weather, and circumstances, all of which could negatively effect your pics down the line. Read about Keeping Your Camera and Sensor Clean to learn the way excellent to guard your self and your digicam, and a way to address the predicted and unexpected hazards alongside the manner.

#four: All approximately Exposure

http://www.boostyourphotography.com/2013/06/all-about-exposure.html

This component collection on exposure included All about Exposure and More on Exposure: a way to restoration common exposure problems. Exposure is a complicated topic, and whole books were written about it. (One such book, Understanding Exposure, become blanketed in my list of favored images books and authors.) These posts provide a thorough advent to the topic of exposure, along with a discussion of accurate and innovative exposure. You can even find recommendation for purchasing the right publicity in a given circumstance and hints like the usage of the AE Lock button or bracketing your pictures (as shown in the moon shots, above).

#3: How Long Does Your Camera's Battery Last?

http://www.boostyourphotography.com/2013/07/battery-life.html

Your camera's battery is important. Do you know how lengthy your camera's battery will final? This publish explains a simple technique for locating out (hinted at within the pics above), as well as realistic advice for keeping battery lifestyles and maintaining your batteries running properly for a long term.

#2: Why Won't My Lens Focus?

http://www.boostyourphotography.com/2013/05/why-wont-my-lens-focus.html

Focus changed into one of the troubles I struggled with at once once I commenced the use of my DSLR for the first time. Turned out that I become missing out on a few very simple statistics approximately lenses and focusing that might have cleared up quite a few my problems without delay. This put up explores the importance of focusing, wherein to recognition, and why your lens may not focus whilst you suppose it need to.

#1: Aperture and the F/Stop Conundrum

http://www.boostyourphotography.com/2013/09/aperture.html

The primary Informational Photography Post on Boost Your Photography was Aperture and the F/Stop Conundrum, the primary in a sequence of four posts about aperture. The rest of the posts protected What an Aperture of F/1.Eight Can Do for You, What an Aperture of F/22 Can Do for You, and the Middle Range Apertures: f/8 to f/11.

For a completely long time, I discovered the language used round aperture to be very perplexing: the bigger vs. Smaller, wider vs. Narrower, shallower vs. Wider intensity of field all served to deepen my confusion as opposed to my information. This collection of posts sought to relieve this confusion and provide an explanation for the f/forestall conundrum once and for all.

Missed one of the Top 5 Top five posts?

  • Top 5 Travel Photography Posts
  • Top 5 Posts with Instant Inspiration Ideas for Photography
  • Top 5 Guest Posts on Photography
  • Top 5 "How To" Photography Posts

Boost Your Photography: Learn Your DSLR is now available from Amazon. Get the most out of your digital camera with practical advice about the technical and innovative components of DSLR photography a good way to have you taking stunning images right away.

Monday, August 24, 2020

Photography Article Top 5 "How To" Photography Posts on Boost Your Photography|Photography Artist Statement

http://www.boostyourphotography.com/2014/01/top5-howto.html

The Top five days of Top 5 posts wraps up with this observe the Top five "How To" Photography Posts from 2013 on Boost Your Photography. While an in advance Top five list included Instant Inspiration Ideas, this submit focuses on photography ideas that might take a little greater advanced planning ...

#five: Long Exposure Photography at the Fair(e)

http://www.boostyourphotography.com/2013/07/fair-photography.html

A carnival or fair(e) is a great place for photography, especially as the sun is setting and into the evening. This post on Long Exposure Photography at the Fair(e) covers the supplies and camera settings you will need to capture stunning long exposure pictures of all the lights and rides. Great fun for the next carnival or fair(e) that comes your way!

#four: Stacking Photographs: Beyond Star Trails

http://www.boostyourphotography.com/2013/07/stacking-star-trails.html

Long, swirling big name trails pictures are on the Bucket Lists of many photographers. This post, Stacking Photographs: Beyond Star Trails, affords each an overview of using stacking for celebrity trail pictures and a few tips for how to follow this strategy to different photography conditions and topics. While stacking photos calls for software, this article affords hyperlinks and information about free programs which are available and do an amazing job.

#three: Shoot the Moon with the Photographers' Ephemeris

http://www.boostyourphotography.com/2013/04/shoot-moon-with-photographers-ephemeris.html

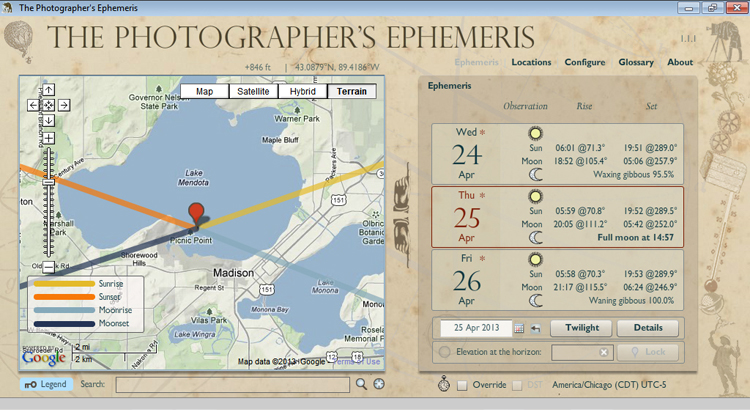
Want to seize an excellent shot of the entire moon growing over a famous or local landmark? Find out how on this post on a way to Shoot the Moon with the Photographers' Ephemeris. The Ephemeris is a unfastened download (on computer systems, the cell apps price money) a good way to allow you to plot and plan your ideal moon upward push, moon set, or maybe dawn and sunset shots. This post will display you ways fine to apply the Ephemeris to seize the ones elusive moon photographs you have been after!

#2: Light Painting: How to Spin an Orb

http://www.boostyourphotography.com/2013/06/light-painting-how-to-spin-orb.html

Mastering the way to spin an orb is every other images Bucket List object and one that is less difficult to gain than you could have found out. This put up, Light Painting: How to Spin an Orb, lays out the fundamental components you'll want, in addition to a thorough evaluation of the settings to your digicam and the strategies behind spinning on the way to provide you with ideal orbs each time. Truly addictive pictures fun!

#1: Spinning Fire with Steel Wool Photography

http://www.boostyourphotography.com/2013/04/spinning-fire-with-steel-wool.html

By a long way the pinnacle put up in our collection of "How To" pictures posts turned into How to Spin Fire with Steel Wool. This post explains all you want to understand to picture spinning metallic wool adequately and efficaciously. The supplies are pretty easy, and this technique is ad infinitum interesting and entertaining. (And, for all you non-DSLR photographers out there, the shot above turned into occupied with a Canon factor-and-shoot camera.)

Catch up on the relaxation of our Top five roundup of Top 5 posts:

  • Top 5 Travel Photography Posts
  • Top 5 Informational Photography Posts
  • Top 5 Posts with Instant Inspiration Ideas for Photography
  • Top 5 Guest Posts on Photography

Boost Your Photography: Learn Your DSLR is now to be had from Amazon. Get the most from your digicam with realistic advice approximately the technical and innovative factors of DSLR images with a purpose to have you ever taking beautiful snap shots right away.

Photography Article How to Photograph Frozen Bubbles|Photography Artist Statement

We interrupt our look-returned on the Top 5 Top five posts of closing year to convey you ...

bubbles, frozen bubbles, frozen bubble photography, how to, photography

There has been a chain of photographs making the rounds of social media sites of frozen bubbles with problematic, frost-like styles (as visible here:http://www.Boredpanda.Com/frozen-bubbles-wintry weather-pictures-angela-kelly/). Since it's been ridiculously cold here inside the Upper Midwest, what better risk to try and see the way to reflect such shots. The detailed the way to description is below.

Supplies

The resources are pretty primary for growing and photographing bubbles. The predominant element, of direction, is what you'll use to make the bubbles. I used standard, save-sold bubble answer, whilst the unique photographer used a homemade solution of dish soap, karo syrup, and water. Use what you have.

You will also want the functionality to take near-up or macro snap shots. You can use a devoted macro lens, just like the Canon 100mm macro, when you have it, or you can use inexpensive macro alternatives like close-up lenses (pictured, available on line for much less than $15USD), which permit you to change the minimal focusing distance of your lens and get toward your concern. I used a 2 near-up lens on my 50mm f/1.8 lens for all of the photographs in this post.

Finally, be sure that you're safely organized for the weather. Temperatures were right around 0F after I turned into taking pictures, so I made sure to double layer my gloves, sporting both the knit pair proven above and a couple of down mittens that could fold lower back to loose my fingers as needed. Be positive you've got a heat coat, pants, headscarf, hat, etc. Consider attempting this technique just outdoor of a heat house or building so you can speedy get interior if you get cold or spill bubble solution all over your gloves, and many others.

Technique for Blowing and Photographing Frozen Bubbles

bubbles, frozen bubbles, frozen bubble photography, how to, photography

The keys to blowing and then photographing frozen bubbles are patience and a piece of practice. Expect the majority of your bubbles to burst, both right now after being blown or once they hit the floor. While the bubbles can be freezing at they fall, they're still in all likelihood to pop after they impact the ground. You additionally want to beware of wind. Calm situations will make it much easier as a way to keep and corral your bubbles.

I had the exceptional consequences with bubbles that I was capable of 'recapture' at the bubble blowing wand. This allowed them the time to slowly freeze over and additionally gave me the option to move them round to get a better heritage for photographing. Even at under zero temperatures, it took longer than I expected for the bubbles to absolutely freeze over. Expect to be maintaining onto them for a full minute or more.

bubbles, frozen bubbles, frozen bubble photography, how to, photography
Even a burst bubble can be exciting.

I highly suggest working towards your bubble blowing, catching, and photographing approach interior first. For me, I selected to preserve the bubble answer in my right hand and to dip and maintain the wand with my left. I kept my camera slung diagonally throughout my chest, with the digicam round to the returned (to avoid dripping any bubble solution on it). Once I had a bubble successfully stuck and freezing, then I should set down the bubble answer, scoop up my digicam, and begin capturing with my right hand handiest.

For digicam settings, I chose to shot in Shutter Priority Mode (Tv on Canon, S on Nikon) with an ISO of two hundred and a shutter speed of one/eightieth of a 2nd. Depending on the mild, this gave me a range of aperture values among round f/14-22. I selected 1/eightieth of a 2nd since it changed into speedy sufficient for hand-retaining a 50mm lens, and the digital camera could then pick out the biggest aperture price viable, taking into consideration a terrific intensity of subject (variety of the bubble floor in consciousness). In brighter light, you will be able to select a fair faster shutter.

Go Forth and Experiment

bubbles, frozen bubbles, frozen bubble photography, how to, photography

Once you have got mastered the techniques, there are infinite ways to customize your frozen bubble pics. Think about deciding on a while of day based totally at the sun, either growing or putting, to get notable golden light and hints of solar for your background. Practice blowing and freezing bubbles and gathering numerous to feature in a unmarried photo. Or pick a particular element to function and focus on. You can be amazed at what you could create!

Catch up on the relaxation of our Top five roundup of Top 5 posts:

  • Top 5 Travel Photography Posts
  • Top 5 Informational Photography Posts
  • Top 5 Posts with Instant Inspiration Ideas for Photography
Want more great ideas?  Follow Boost Your Photography on Pinterest: Boost Your Photography

Boost Your Photography: Learn Your DSLR is now available from Amazon. Get the most out of your digicam with sensible recommendation about the technical and creative aspects of DSLR pictures a good way to have you taking lovely photographs proper away.

Sunday, August 16, 2020

Photography Article Make the Shot: Droplet Refraction|Photography Artist Statement

Keeping our subject of macro and droplet images (Make the Shot: Water on CD), present day post offers you a behind-the-scenes study the classic water droplet multiplicity shot.

How to Shoot a Multidroplet Shot

You only need a few basic supplies to replicate a shot like the one above.

  • A piece of glass or glass dishware (I used the glass from a photo frame for an 8x10.)
  • Water spray bottle or eyedropper
  • Plastic wrap
  • Supports to hold up the glass (I used four pint glasses.)
  • Colorful patterned paper or fabrics (You can even use an image on your tablet.)
  • Tripod recommended (Read How to Maximize Your Tripod here.)

The setup, as proven under, is straightforward. Find a spot with a number of natural light (premiere, however you could also attempt with indoor lights too). Place the pint glasses some distance enough aside that you may effortlessly slide your patterned paper, fabric, or pill under. Wrap to top of your glass or glass dishware with a bit of plastic wrap. (The plastic wrap will assist the water bead up on the surface. Water sprayed on glass alone is much more likely to surely run off and smear.)

Use the water spray bottle to cover the plastic-wrapped glass in beads of water. Spray the use of a high-quality mist placing. The longer you spray, the more the water will conglomerate and the larger and larger your droplets may be. The aim is to have a good collection of comparable-sized droplets. (Alternatively, you can mix your water with a touch glycerin to boom the surface anxiety. And/or you can use a watch dropper to carefully vicinity evenly-spaced and sized drops.)

One you have your droplets searching the way you want them, you can lay out your first background pattern piece underneath the glass. (Wait until after you are completed spraying to do this element, otherwise your paper will come to be soaked.) Then, set up your tripod, if using. You will want to place your camera above the glass with the lens of the digicam parallel to the glass. This will make certain even focus throughout as many droplets as possible. Consider the use of a close-up lens, extension tubes,reverse ring mount adapter, or a macro lens to get a fair nearer-in shot of the droplets.

Unfocused Droplet Refraction | Boost Your Photography

You will want to shoot with a fairly narrow aperture (like f/14 or f/22) on the way to get the whole droplet in awareness from pinnacle to backside. The photo above turned into shot at the huge aperture of f/2.Five, which has a very skinny intensity of area. In this shot, it's miles clean that only the pinnacle of the droplet is in cognizance. The aspects of the droplet, in evaluation, are already blurry and out-of-awareness.

This photograph was shot at f/14, which required a shutter speed of 1/3rd of a second. At that slow of a shutter, it is imperative to use a tripod, as any attempt at hand-holding for that long with result in visible camera blur and shake. Even at f/14, you may notice that the smaller droplets are not in focus but that you can clearly see the refracted and distorted views through the top and sides of the larger-sized droplets.

Play around with exclusive shapes and sorts of backdrops. 12x12 inch scrapbook paper works sincerely nicely as a supply for styles, as it's miles without problems obtained, less expensive, and a big enough size to cowl the entire refracted vicinity within the droplets. Both the flowers and shamrocks above have been scrapbook paper.

For this photograph, I used a image of mine shown on a 7 inch tablet. Because of the smaller size of the tablet, in comparison to the 12-inch paper, you can really see the edges of tablet or even the nearby window refracted in some of the droplets.

Water Droplet Refraction of a Flower | Boost Your Photography

You can also use a unmarried picture, as opposed to a repeating design or sample. In the photograph above, every droplet is refracting a photograph of a unmarried water lily. This was a five x 7 inch image, and the white edges of the photograph are seen in a number of the droplets.

You can also see how the refracted image is rightside-as much as our eyes but that the unique picture is upside-down. Keep in thoughts that refracted images may be reversed if you are the use of an picture or pattern that has a discernible pinnacle and backside.

What Will You Refract?

The droplet refraction possibilities are infinite. What will you refract? Share a link inside the remarks beneath!

Want more tremendous thoughts? Follow Boost Your Photography on Pinterest: Boost Your Photography

Saturday, August 15, 2020

Photography Article Teaching Kids Photography: Shooting Modes, Focus, and Exposure|Photography Artist Statement

Photography is a extremely good interest to percentage with youngsters, and the ever-increasing accessibility of point-and-shoot cameras and camera phones makes this even easier. This is the first article in an occasional collection approximately Teaching Kids Photography. Part 2 specializes in Composition and Design. (You might even learn something new your self!)

Teaching Photography: wherein to begin?

Last semester, I ran a monthly Photography Club for upper elementary and middle school students. Many of the students had never really been given an opportunity to use a digital camera and were excited to learn. The biggest question in my mind, of course, was where to start?

I knew that one of my desires become to assist teach them a way to control their cameras and to get the sort of pictures they estimated. So, I determined first of all a short review of the normally to be had capturing modes, so that they may immediately circulate past Auto and exert a few degree of manipulate over their digital camera.

Common Shooting Modes

Students either brought in a phone or camera from home or shared some of the few point-and-shoot cameras provided by myself and the school, so everyone had different menus and options to choose from. With that in mind, I only introduced some of the more common shooting modes that are widely available on digital cameras.

Photographing commenced right from the begin. Here, a student captured me in motion, discussion shooting modes.

Below is an simpler-to-study model of the slide that I become showing, detailing a number of the maximum commonplace taking pictures modes available on point-and-shoot and DSLR cameras.

Examples of Shooting Modes in Photography | Boost Your Photography

Macro and portrait modes were by-a ways the most popular. Later on, a few youngsters selected to discover some of the extra unusual taking pictures modes and consequences, like taking photographs in 'toy camera' mode to make the entirety look small and dollhouse-like or fisheye-type consequences. By know-how what mode to pick out for a given photography scenario, the kids were better-able to capture the forms of pictures they desired.

Toy Camera Effect on the close by production website online

Focus and Exposure

My other main lesson for our first meeting was the link between focus and exposure with point-and-shoot cameras. With a point-and-shoot camera, when you press the shutter down halfway, the camera locks focus. Pressing the shutter the rest of the way takes the picture. But what I wanted the kids to understand was that pushing the shutter down halfway also locks the exposure or how light or dark the final photograph appears. (For more technical details about exposure, especially with DSLR cameras, read All about Exposure and Troubleshooting Your Exposure.)

For our first test, I requested every body to show round and point their cameras on the window. Then, holding down the shutter halfway, I asked them to have a look at how the digicam interpreted the scene. The 2nd step became to trade the composition barely in order that it blanketed a great phase of the wall next to the window and to repeat protecting down the shutter. They were surprised at the dramatic variations in mild and darks between the two perspectives.

Focus and exposure locked at the center of the image.
Focus and exposure also locked at the center of the image.

This led to a brief discussion of the method of "Focus and Recompose." The concept here is that you first determine on the composition you want (say, a view out the window). Then, you hold the shutter halfway down and notice if the model in the viewfinder fits how you wanted the scene to look. If not, change the composition barely, depress the shutter halfway, and then pass the digital camera lower back to the unique composition. Even with out understanding some thing else about exposure or digital camera settings, the youngsters had been without problems able to manipulate and control the desired lightness and darkness in their photos.

Photography Exploration

The most important part of any photography lesson, however, is the application. After the initial lesson and discussion described above, we took a forty-five minute slow-moving walking tour outside on the playground and nature trail. I hung back to answer questions, and the kids were free to explore and photograph whatever inspired them. The following are just a few small samples of their creativity during our first meeting. (I have deliberately left out identifiable photographs of the students themselves, so just imagine an additional quantity of portrait-style and "I'm taking a photo of you taking a photo of me!"-style shots here too.)

Close-up photograph of a milkweed pod
Exploring patterns from beneath the play equipment
An effort to capture the motion of jumping
Blur from intentional camera movement using a slower shutter speed

There are infinite one-of-a-kind approaches to educate children images and to nurture a love of photographing and exploring the world around them. Since I became working with older youngsters (10-14 12 months olds), it made experience to begin with a number of the technical controls earlier than allowing them to loose to explore. With more youthful youngsters, you may need to recognition extra on simply the concept of recognition or on holding the digital camera still while capturing. Part 2 in this collection makes a speciality of coaching approximately composition and layout.

Where did you start with coaching kids approximately photography? Share a tip or recommendation inside the comments under!

Boost Your Photography: Learn Your DSLR is now available from Amazon. Get the most from your camera with sensible recommendation about the technical and creative factors of DSLR images to be able to have you taking stunning pics proper away.