Showing posts with label Make the Shot. Show all posts

Sunday, August 30, 2020

Photography Article Fall Round Up|Photography Artist Statement

Just in time for Thanksgiving, it's the Fall Round Up: your one-stop spot for a look back at this fall's posts. Catch up on the previous round ups here:Spring and Summer.

Yes, Go Chasing Waterfalls

Musings:

  • Photography Is ... What is photography for you? Some thoughts about the importance of timing, patience, and luck.
  • Boost Your Photography: Set a Goal or Challenge - Learn how setting, reviewing, and revising a photography goal or challenge can help move you forward in your photography.
  • Photography Gifts for the Holidays and Where to Order Holiday Photography Gifts - Put your photography to good use this holiday season. Read about the wide variety of ways you can use your images to create memorable gifts for friends and family.
A collage mug is one of many ways you can use your photography for gifts.

For Beginners:

Explanations and overviews geared towards those wanting to get more out of their photography. Many of the 'Tips and Tricks' and 'Inspired Ideas' are also applicable.

  • Aperture and the F-Stop Conundrum - Confused about aperture? This article is the place to start. The rest of this mini-series divides the aperture section into three:What an Aperture of F/1.8 Can Do for You,The Middle Range Apertures: f/8 and f/11, andWhat an Aperture of F/22 Can Do for You.
  • Camera Lenses: What's In a Name? - An overview of camera lens naming conventions and what you need to know when looking for a new lens,Learn Your Lens: the lens itself - All about the functions and features of a lens, and Learn Your Lens: the accessories - Learn which camera lens accessories you need and how to use them.
  • Yes, You Need a 50 mm Lens - Find out why a 50 mm lens is a great upgrade, especially from your kit lens(es), and it's a great steal, priced around $100.
Comparison of changing apertures from the wide, middle, and narrow ends of the spectrum.

Tips and Tricks:

Advice for getting the most of your camera and photography

  • Zooming vs. Cropping: perspective in photography - Understand the differences between zooming vs. your lens, cropping afterwards, and the importance of changing your perspective.
  • Easy Photography Upgrade: get a remote shutter release - Around $6 for a remote can make a big impact in your photography.
  • Shoot a Successful Self-Portrait - Learn how to shoot a better selfie: how to focus and set the scene as well as a variety of ideas to try.
  • Improve your Fall Photography: use a polarizer - Get those blue skies you've always wanted. Learn how to use a circular polarizer.
  • Panning in Photography - Learn how to create panning shots with a frozen main subject and moving background.
  • Thankful ... for Food Photography - A collection of tips and tricks for improving your food photography shots.

Inspired Ideas:

How to make the shot with specific photography ideas

  • 50th Post and Six Month Blogoversary - Count down the Top 5 Most-Viewed Posts of the first 50
  • Make the Shot: Slow Sync Photography - Get a behind-the-scenes explanation of how to create your own ghostly images using the slow sync function of your on-camera flash.
  • Yes, Go Chasing Waterfalls - Suggestions and advice for what to bring and how best to shoot waterfalls with that long, silky water look.
  • Local Tourism: Photograph the Harvest - Find photographic inspiration in your local harvest. Visit a pick-your-own orchard or pumpkin patch.

Travel Photography

  • Photography Collections: start a collection - Consider a collage as a way to display travel memories. Unify your collage by focusing on a specific item or element, like full doors, door knobs, or even hearts.
  • Window on the World - Windows are a unique way of placing the viewer within the frame of your photograph. Consider paying attention to windows when you travel.

Stay Connected:

Don't miss a single post from Boost Your Photography

  • Follow along onFacebook -www.facebook.com/BoostYourPhotography.
  • Follow along onGoogle+ -Boost Your Photography on Google+ (or click the 'Follow' button near the top of the right-hand column.)
  • Follow along onTwitter -@archaeofrog .
  • Sign up to receive each new post by email. (The subscription box is in the right-hand column. Email addresses will never be sold or distributed.)
  • Subscribe using your favorite RSS reader. (Click the 'subscribe now' button in the right-hand column or typewww.boostyourphotography.com into your RSS reader.)

Saturday, August 29, 2020

Photography Article Guest Post: Sun Flare and Starbursts|Photography Artist Statement

Jump on over to Digital Photography School to study a guest publish that I even have written on Using Sun Flares and Starbursts to Create Stunning Images.

Here's another example to get you commenced:

Sun Flare created with a Late Fall Sun

Photography Article All about Bokeh|Photography Artist Statement

Bokeh is a Japanese term utilized in photography to describe the out-of-consciousness areas of an picture and is often created deliberately for artistic effect. There are several factors that influence the appearance and impact of bokeh in an picture, and this newsletter will discover the ones elements and provide you with recommendation about the way to first-class attain the 'bokeh appearance' with the device you have already got. The 2d article on this collection will introduce the concept of 'fashioned bokeh' and explain the way to control the shape and layout of background bokeh.

Creating Bokeh: Aperture

In order to create bokeh, you need to have a section of your image that is outside the depth of field (the area of the photograph in focus), and this area is generally in the background, rather than the foreground, of your composition. The narrower your depth of field, the easier it is to create bokeh in the background.

There are several approaches to create a slim intensity of discipline. The easiest manner is to shoot at a reasonably wide aperture, including f/1.8. The wider the aperture cost, the narrower the intensity of discipline, and the thinner the section of the photo this is in attention, the extra of the heritage that becomes out-of-awareness. Opening your lens as much as its maximum aperture can even create a 'smoother' appearance to the history and bokeh.

Bokeh created by means of putting daylight bouncing off the water.

One reason for the popularity of the 'nifty 50' or 50mm lenses is their capability to obtain an aperture of f/1.8 for a noticeably low price for a digicam lens. (50mm starter lenses are to be had from Canon for $110 and from Nikon for $110. Read greater in Yes, You Need a 50mm Lens.) At f/1.8 with these lenses, the background bokeh will become vibrant circles of light. As you close up down your lens and slender the aperture, but, the form of the heritage bokeh changes, based at the number of blades within the lens. The Canon 50mm f/1.8 lens has five blades, this means that that the bokeh becomes pentagonal at slim apertures.

Foreground and history snow bokeh. The pentagonal form resulted from the 50mm lens at f/6.Three.

If you do not have a 50mm lens and as an alternative have handiest the lens or lenses that got here with your digital camera, then it's far possibly the widest aperture you could acquire will be between f/three.Five and f/5.6, relying on your focal length. You can still achieve a bokeh effect at those apertures, but you may want to use additional techniques to do so.

Other Strategies for Creating Bokeh

You can improve the blur of your background bokeh in other ways. Increasing the distance between your subject and the background will improve the bokeh. The closer the background is to your subject, the more likely it is to fall within the depth of field or just outside. As you move your subject farther away from the background, however, the increased distance will make it more likely that the background will fall outside of the area in focus.

Violets from above at f/5.6. Minimal blur and bokeh due to closeness of background.
Violet from the side at f/5.6. Greatly increased blur and bokeh due to distance to background.

You also can enhance the history bokeh by getting towards your problem. Even in case you keep the aperture the equal, the relative width of the intensity of area will slender as you approach your concern. Moving the point of interest nearer as your challenge movements nearer additionally makes the background rather farther away. You can do that by means of shifting physically closer in on your situation or by means of the use of a zoom lens and zooming in for a closer in view of your difficulty.

The collection of snap shots below demonstrates the difference that the position of cognizance could make on the form and size of the bokeh. As the location in awareness actions farther and farther away from the digicam, the bright bokeh mild circles come to be smaller and smaller. By the lowest proper photograph, the tiny vacation lighting are now absolutely in consciousness and no longer developing bokeh.

For this bokeh-stuffed portrait, below, the situation turned into located fairly near the digicam (about five toes) with the heritage significantly farther away (approximately fifteen to 20 ft). The pop-up flash at the digital camera become used to light up the concern, at the same time as an extended shutter speed (zero.6 seconds) supplied the brightness within the bokeh lighting fixtures.

Bokeh-licious Portrait by Archaeofrog on Flickr

You can combine those two suggestions (closer challenge and farther background) to reap bokeh in spite of a point-and-shoot digicam. If you use the macro putting (the tulip symbol), get in close to your subject, and preserve the heritage farther back, you may be able to gain a few measure of beautiful historical past blur and bokeh.

Point-and-Shoot Bokeh (Canon A4000IS)

Improving the Quality of Your Bokeh

Certain backgrounds lend themselves to better bokeh effects than others. Bokeh is all about light, and the more light you have reflecting or shining off objects in the background, the better your camera will be able to render the blurred, bokeh look. Point sources of light work particularly well for bokeh, as each point source can be rendered as an individual, bright circle of out-of-focus light. (Read more about point sources of light in my guest post on Digital Photography School: Using Sun Flares and Starbursts to Create Stunning Images.)

Holiday mild, street lighting, or even car headlights are famous choices for brilliant, bokeh-crammed backgrounds at night. Try the usage of a combination of all 3 techniques above to capture the look you need. Start with your widest aperture after which see how converting the distance among the digital camera and the concern and changing the distance among the situation and the background changes the final look of your image.

Christmas decoration with bokeh. Ornament turned into held barely in the front of tree

to increase background distance and create better bokeh.

You also can create bokeh during the day. Light filtering through trees and leaves can make appealing bokeh. You will get better results in advance inside the morning or later in the afternoon, while the solar is decrease inside the sky. These lengthy, vibrant rays and sundry shadows can create an thrilling framework to apply for growing bokeh.

Backlit bokeh from the afternoon solar

Color and mainly contrasting colours are some other vital issue to consider. If you really want to create a completely unique or memorable appearance the usage of bokeh, try to discover or create a state of affairs wherein the historical past bokeh is a contrasting colour to your predominant problem. This will similarly intensify the variations among the situation and the background and help make your problem 'pop.'

The vibrant oranges of the foreground leaves contrast with the blues and veggies of the background.

Bokeh Summary

Bokeh is a great photography effect and one that can add a unique and memorable twist to your images. While bokeh often begins with aperture, you should also pay attention to your distances: zoom in to create more blur, get closer to your subject to narrow the depth of field, or move your subject farther away from the background to be sure that it falls out of focus. Find some bright lights or bright sun and see what you can create!

Tuesday, August 25, 2020

Photography Article Top 5 Instant Inspiration Posts on Boost Your Photography|Photography Artist Statement

http://www.boostyourphotography.com/2014/01/top5-inspiration.html

The 0.33 put up in our Top five collection of posts from 2013 functions a set of "on the spot notion" ideas: pics that you can take right now, nowadays, likely using best substances and components which you have already got lying around. (Previous Top 5 posts include Top five Travel Photography Posts and Top five Informational Photography Posts.)

#5: Puddle Reflection Photography

http://www.boostyourphotography.com/2013/06/puddle-reflection-photography.html

Reflections are a famous images subject. But if you thought you wanted a giant lake and still, clean water to get that best reflection, than Puddle Reflection Photography could be a welcome remedy. All you want is a small amount of water - even a gutter puddle will do, and that is a technique that works genuinely nicely with point-and-shoot cameras as well as DSLRs.

#4:Shoot a Successful Self-Portrait

http://www.boostyourphotography.com/2013/11/selfie.html

Self-portraits, or selfies, are a excellent idea for when you need at once concept. All you need is your self and a digital camera. But, if you need to head a bit greater past the 'turn camera around and shoot your face from arms duration,' then this put up on how to Shoot a Successful Self-Portrait is for you.

#3: Make the Shot: Spoon Reflection Photography

http://www.boostyourphotography.com/2013/07/spoon-reflection-photography.html

Spoon reflections or spoonflections are a fun and innovative images concept that you may do right now. All you want is a spoon and an interesting surface to set it on. This post on Spoon Reflection Photography covers, in-depth the digicam settings and strategies to apply to get the fine consequences. A brilliant idea to spice up a bored indoor images day!

#2: Photography Inspiration: Found Book Poetry

http://www.boostyourphotography.com/2013/04/photography-inspiration-found-book.html

This smart pictures concept combines two incredible innovative endeavors: images and poetry. Use the books around you to create, set up, and compose a Found Book Poem. The possibilities are countless, and you could find that the restricted phrase desire stretches you in powerful approaches.

The Whales

Black and White

Learning to Swim in Swaziland

To See the Moon

Underneath

Many Waters

#1: Easy Photography Upgrade: the Tri-Fold Board

http://www.boostyourphotography.com/2013/07/trifold-board.html

The most famous post protecting on the spot images ideas changed into this one proposing ... The common-or-garden tri-fold board. Tri-fold forums are pleasant recognised from Science Fairs and college presentations, but they make extremely good backgrounds and reflectors for photography. Read on approximately this clean pictures improve to look why a simple tri-fold board is a extraordinary photography funding.

Catch up on the rest of our Top 5 roundup of Top 5 posts:

  • Top 5 Travel Photography Posts
  • Top 5 Informational Photography Posts

Boost Your Photography: Learn Your DSLR is now to be had from Amazon. Get the most out of your digital camera with sensible advice about the technical and innovative elements of DSLR images to be able to have you taking lovely pics proper away.

Monday, August 24, 2020

Photography Article Top 5 "How To" Photography Posts on Boost Your Photography|Photography Artist Statement

http://www.boostyourphotography.com/2014/01/top5-howto.html

The Top five days of Top 5 posts wraps up with this observe the Top five "How To" Photography Posts from 2013 on Boost Your Photography. While an in advance Top five list included Instant Inspiration Ideas, this submit focuses on photography ideas that might take a little greater advanced planning ...

#five: Long Exposure Photography at the Fair(e)

http://www.boostyourphotography.com/2013/07/fair-photography.html

A carnival or fair(e) is a great place for photography, especially as the sun is setting and into the evening. This post on Long Exposure Photography at the Fair(e) covers the supplies and camera settings you will need to capture stunning long exposure pictures of all the lights and rides. Great fun for the next carnival or fair(e) that comes your way!

#four: Stacking Photographs: Beyond Star Trails

http://www.boostyourphotography.com/2013/07/stacking-star-trails.html

Long, swirling big name trails pictures are on the Bucket Lists of many photographers. This post, Stacking Photographs: Beyond Star Trails, affords each an overview of using stacking for celebrity trail pictures and a few tips for how to follow this strategy to different photography conditions and topics. While stacking photos calls for software, this article affords hyperlinks and information about free programs which are available and do an amazing job.

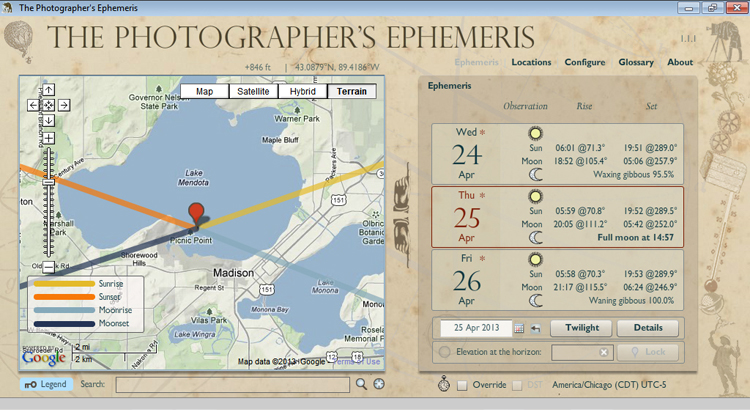
#three: Shoot the Moon with the Photographers' Ephemeris

http://www.boostyourphotography.com/2013/04/shoot-moon-with-photographers-ephemeris.html

Want to seize an excellent shot of the entire moon growing over a famous or local landmark? Find out how on this post on a way to Shoot the Moon with the Photographers' Ephemeris. The Ephemeris is a unfastened download (on computer systems, the cell apps price money) a good way to allow you to plot and plan your ideal moon upward push, moon set, or maybe dawn and sunset shots. This post will display you ways fine to apply the Ephemeris to seize the ones elusive moon photographs you have been after!

#2: Light Painting: How to Spin an Orb

http://www.boostyourphotography.com/2013/06/light-painting-how-to-spin-orb.html

Mastering the way to spin an orb is every other images Bucket List object and one that is less difficult to gain than you could have found out. This put up, Light Painting: How to Spin an Orb, lays out the fundamental components you'll want, in addition to a thorough evaluation of the settings to your digicam and the strategies behind spinning on the way to provide you with ideal orbs each time. Truly addictive pictures fun!

#1: Spinning Fire with Steel Wool Photography

http://www.boostyourphotography.com/2013/04/spinning-fire-with-steel-wool.html

By a long way the pinnacle put up in our collection of "How To" pictures posts turned into How to Spin Fire with Steel Wool. This post explains all you want to understand to picture spinning metallic wool adequately and efficaciously. The supplies are pretty easy, and this technique is ad infinitum interesting and entertaining. (And, for all you non-DSLR photographers out there, the shot above turned into occupied with a Canon factor-and-shoot camera.)

Catch up on the relaxation of our Top five roundup of Top 5 posts:

  • Top 5 Travel Photography Posts
  • Top 5 Informational Photography Posts
  • Top 5 Posts with Instant Inspiration Ideas for Photography
  • Top 5 Guest Posts on Photography

Boost Your Photography: Learn Your DSLR is now to be had from Amazon. Get the most from your digicam with realistic advice approximately the technical and innovative factors of DSLR images with a purpose to have you ever taking beautiful snap shots right away.

Photography Article How to Photograph Frozen Bubbles|Photography Artist Statement

We interrupt our look-returned on the Top 5 Top five posts of closing year to convey you ...

bubbles, frozen bubbles, frozen bubble photography, how to, photography

There has been a chain of photographs making the rounds of social media sites of frozen bubbles with problematic, frost-like styles (as visible here:http://www.Boredpanda.Com/frozen-bubbles-wintry weather-pictures-angela-kelly/). Since it's been ridiculously cold here inside the Upper Midwest, what better risk to try and see the way to reflect such shots. The detailed the way to description is below.

Supplies

The resources are pretty primary for growing and photographing bubbles. The predominant element, of direction, is what you'll use to make the bubbles. I used standard, save-sold bubble answer, whilst the unique photographer used a homemade solution of dish soap, karo syrup, and water. Use what you have.

You will also want the functionality to take near-up or macro snap shots. You can use a devoted macro lens, just like the Canon 100mm macro, when you have it, or you can use inexpensive macro alternatives like close-up lenses (pictured, available on line for much less than $15USD), which permit you to change the minimal focusing distance of your lens and get toward your concern. I used a 2 near-up lens on my 50mm f/1.8 lens for all of the photographs in this post.

Finally, be sure that you're safely organized for the weather. Temperatures were right around 0F after I turned into taking pictures, so I made sure to double layer my gloves, sporting both the knit pair proven above and a couple of down mittens that could fold lower back to loose my fingers as needed. Be positive you've got a heat coat, pants, headscarf, hat, etc. Consider attempting this technique just outdoor of a heat house or building so you can speedy get interior if you get cold or spill bubble solution all over your gloves, and many others.

Technique for Blowing and Photographing Frozen Bubbles

bubbles, frozen bubbles, frozen bubble photography, how to, photography

The keys to blowing and then photographing frozen bubbles are patience and a piece of practice. Expect the majority of your bubbles to burst, both right now after being blown or once they hit the floor. While the bubbles can be freezing at they fall, they're still in all likelihood to pop after they impact the ground. You additionally want to beware of wind. Calm situations will make it much easier as a way to keep and corral your bubbles.

I had the exceptional consequences with bubbles that I was capable of 'recapture' at the bubble blowing wand. This allowed them the time to slowly freeze over and additionally gave me the option to move them round to get a better heritage for photographing. Even at under zero temperatures, it took longer than I expected for the bubbles to absolutely freeze over. Expect to be maintaining onto them for a full minute or more.

bubbles, frozen bubbles, frozen bubble photography, how to, photography
Even a burst bubble can be exciting.

I highly suggest working towards your bubble blowing, catching, and photographing approach interior first. For me, I selected to preserve the bubble answer in my right hand and to dip and maintain the wand with my left. I kept my camera slung diagonally throughout my chest, with the digicam round to the returned (to avoid dripping any bubble solution on it). Once I had a bubble successfully stuck and freezing, then I should set down the bubble answer, scoop up my digicam, and begin capturing with my right hand handiest.

For digicam settings, I chose to shot in Shutter Priority Mode (Tv on Canon, S on Nikon) with an ISO of two hundred and a shutter speed of one/eightieth of a 2nd. Depending on the mild, this gave me a range of aperture values among round f/14-22. I selected 1/eightieth of a 2nd since it changed into speedy sufficient for hand-retaining a 50mm lens, and the digital camera could then pick out the biggest aperture price viable, taking into consideration a terrific intensity of subject (variety of the bubble floor in consciousness). In brighter light, you will be able to select a fair faster shutter.

Go Forth and Experiment

bubbles, frozen bubbles, frozen bubble photography, how to, photography

Once you have got mastered the techniques, there are infinite ways to customize your frozen bubble pics. Think about deciding on a while of day based totally at the sun, either growing or putting, to get notable golden light and hints of solar for your background. Practice blowing and freezing bubbles and gathering numerous to feature in a unmarried photo. Or pick a particular element to function and focus on. You can be amazed at what you could create!

Catch up on the relaxation of our Top five roundup of Top 5 posts:

  • Top 5 Travel Photography Posts
  • Top 5 Informational Photography Posts
  • Top 5 Posts with Instant Inspiration Ideas for Photography
Want more great ideas?  Follow Boost Your Photography on Pinterest: Boost Your Photography

Boost Your Photography: Learn Your DSLR is now available from Amazon. Get the most out of your digicam with sensible recommendation about the technical and creative aspects of DSLR pictures a good way to have you taking lovely photographs proper away.

Photography Article Fun with Fizzy Fruit Photography|Photography Artist Statement

http://www.boostyourphotography.com/2014/01/fizzy.html

Bright, high key, fizzy fruit photographs are a fantastic object to move off your photography bucket listing on a rainy (or snowy) day. While they'll appearance tough, you can get wonderful effects with only some simple resources. This publish will walk you via the fundamentals of creating charming fizzy fruit photographs.

Supplies for Shooting Fizzy Fruit

You can shoot fizzy fruit shots with a point-and-shoot camera or a DSLR. If you use a point-and-shoot, you will want to shoot on the macro setting (tulip symbol), which allows you to focus up-close and take detailed shots. If you use a DSLR, you can use a dedicated macro lens, if you have one. If not, you can use your longest zoom lens (zoomed in to its farthest focal length, like 200mm or 270mm etc.) or you can use accessories to turn your 50mm or kit lens into an inexpensive macro lens. (Read specifics on how to use close-up lenses, extension tubes, or a reverse mount adapter for close-up photography.) All of the photographs in this post were taken with a Canon 50mm f/1.8 lens with a +10 close-up lens (or a +4 and a +10 stacked together). A tripod and remote shutter release can be helpful, but you can also shoot hand-held if you have a fast lens (wide aperture like f/1.8) and good lighting.

http://www.boostyourphotography.com/2014/01/fizzy.html
The blur of bubbles adds to the feeling of movement in this shot.

Lighting can be as easy as a bendy desk lamp or pedestal light. You want some thing that you can function without delay in the back of the fruit, so that mild is shining directly via the fruit and into your digital camera. I actually have had excellent good fortune with a easy column mild, proven below, that is only a mild bulb interior a frosted column. A unmarried piece of tissue paper changed into used over the mild to behave as a diffuser and make the mild softer and more frivolously spread out.

Finally, you'll additionally need fruit, a box to hold each the fruit and the liquid, and a fizzy liquid. For a long term, I was harassed while studying peoples' feedback that they'd used lemonade for those kinds of shots. I in the end found out the lemonade in England or Australia isn't always the same as lemonade right here within the US and that a better equal might be sparkling mineral water. I even have also had some good fortune with Champaign, but the bubbles have been not as furious or long-lasting.

For boxes, you need something glass with as a minimum one straight aspect to shoot thru. This is a superb item to look out for at thrift stores, as you can regularly discover old vases for subsequent-to-nothing. My preferred, shown above, is a completely narrow vase with two instantly facets that I found at a hobby shop for less than $10 USD.

As for the fruit, you want something that you'll be able to reduce into thin slices. The thinner you can slice it, the more mild will shine through, making it simpler to photo and seize information. I might estimate my slices were among an eighth and 1 / 4 of an inch. Citrus works mainly properly, however you could experiment with a wide variety.

Once you have collected your resources, you need to set up your mild source so that it is behind the vase or field and could be shining at once at your camera. My pedestal light became massive enough to absolutely relaxation flat at the desk, but you may additionally use a stack of books to prop up your mild to get the proper attitude.

Tips and Techniques for Shooting Fizzy Fruit

Pour in your fizzy liquid, seize your fruit and your digital camera, and you're equipped to move! The largest problem I discovered when taking those shots is that the movement of the bubbles prompted the slices of fruit to bop and spin round in the vase. If you are able to shoot at a brief sufficient shutter speed (like 1/250th of a second or quicker), then this might not be a hassle. Otherwise, you will need to locate a few manner of anchoring down your fruit whilst you are capturing. My improvised approach become absolutely to use my left hand to maintain the fruit steady in opposition to one wall of the vase and then shoot with simplest my proper hand. An smooth alternative would be to installation the tripod for the digicam, keep the fruit with one hand or with tongs, and use a far off with the opposite.

http://www.boostyourphotography.com/2014/01/fizzy.html

As for settings, I chose to shoot in Aperture Priority with ISO 2 hundred and a wide aperture of around f/1.Eight-3.Five. I used the slightly narrower apertures of f/2.8 and f/3.Five close to the stop of the shoot, when I turned into looking to get a bit extra focus and definition out of the bubbles.

You can also need to don't forget the use of Exposure Compensation to overexpose the photo barely (from one 1/3 to one full forestall inside the superb path on the dimensions). This will assist the heritage end up a more real white and brighten up the fruit as properly. Experiment to look what appearance works pleasant for you.

http://www.boostyourphotography.com/2014/01/fizzy.html
At +1/3 exposure compensation, the kiwi fruit is still fairly dark in this photograph.
http://www.boostyourphotography.com/2014/01/fizzy.html
+1 exposure compensation makes the fruit much lighter and more vibrant.

Try for a aggregate of truly near-up in addition to farther returned shots. You may even see variations if you keep the fruit up in opposition to the the front of the vase as compared to the back. If you sense like your bubbles are running out of 'oomph,' let pass of your fruit or leap it around a touch bit, to carry lower back the internal fizz.

You will discover that your depth of discipline (the area of the challenge in recognition) can be very thin, both from using a extensive aperture and from shooting your situation up-near. Play round with having one-of-a-kind components of your fruit in consciousness ? The bubbles in front vs. The bubbles around the sides, as an instance. Even out of focus bubbles make for interesting compositions.

http://www.boostyourphotography.com/2014/01/fizzy.html
Focusing on the bubbles in front makes the bubbles along the perimeters come to be little out-of-focus dots and bokeh.

Alternatives

There are many different ways that you can setup to shoot fizzy fruit, and this is only one example. The orange, below, was shot in a wine glass against a black tri-fold board backdrop (read more about the humble tri-fold board for photographs ). In this case, the fruit was lit from the front by very bright, direct sunlight streaming through a nearby window. This natural light was enough to even light the fruit and give it a different feel against the dark background.

Don't sense restrained to simply shoot fruit either. All kinds of items can appearance more interesting with bubbles. (I used two of the lamps for the colored pencils, underneath: one from behind to mild the liquid and bubbles, and one from the front to light up the pencils themselves.)

Experiment and feature fun it! See what you could give you, and experience free to put up a link within the feedback to any successes you might have.

Want more great ideas?  Follow Boost Your Photography on Pinterest: Boost Your Photography

Boost Your Photography: Learn Your DSLR is now to be had from Amazon. Get the maximum from your camera with realistic advice about the technical and innovative aspects of DSLR photography a good way to have you ever taking stunning pics proper away.

Sunday, August 23, 2020

Photography Article How to Take Better Snow Photographs|Photography Artist Statement

snow, snow photography, photography, how to, winter photography

Winter has calmed down a chunk right here, with the passing of the Polar Vortex, and the reintroduction of affordable winter weather. What higher time to consider getting out and taking a few snow pix? Read on for recommendation and recommendations for the way to take better snow pix.

Up Your Exposure

Snow is fundamentally difficult to photograph accurately. I see snow and know that it is white; you see snow and know that it is white; but your camera sees snow and does not know that snow is white. Your camera and its sensor see snow and know that it is brighter than the 'expected' exposure. It responds (assuming you are shooting in any mode other than manual) by taking a photograph that darkens the snow to match the average exposure of an image. (Confused about exposure? Take a moment to catch up here by reading All about Exposure and More about Exposure: how to fix common exposure problems.)

snow, snow photography, photography, how to, winter photography
Here the snow seems a good deal darker than it did.

If you are not ready to make the bounce to shooting in full guide mode, there is an smooth way to inform your digicam which you need your snow to turn out brilliant and white: publicity reimbursement. The publicity reimbursement scale, to be had on DSLR as well as many point-and-shoot cameras, permits you to 'tell' your digicam that you need your snap shots brighter (high quality) or darker (poor) than the digicam's default expectation. For maximum snowy conditions, you ought to alter the exposure repayment for your digital camera to among 1/2 and 1 complete prevent of exposure. (Depending in your digital camera settings, your exposure scale can be in thirds or half gadgets, known as stops.) Many DSLR cameras additionally have the choice to 'bracket' your publicity or take 3 or greater pictures in a row at different locations along the exposure reimbursement scale. When taking pictures snowy scenes, I frequently set my digital camera to shoot 3 bracketed photographs at zero, 1, and 2 stops.

You want to strike a balance between brightening up the snow to the white that it appeared to your eyes without losing its structure and definition. If your snow becomes too bright (overexposed), then it becomes a featureless, white mass rather than an identifiable snowscape. Bracketing your shots gives you the advantage of choosing your favorite in the sequence home on your computer, rather than relying on your LCD screen while you are out shooting. In the example shots above, the normal exposure (left) seems too dark, while the +2 exposure (right) is too bright, leaving the +1 exposure as a good, balanced shot.

Follow the Snow

Memorable snow pix require endurance and timing. While you can photo snow lying on the ground on almost any given day, you may handiest image pristine white snow just as or simply after it has finished falling. The glorious snow that sticks to bushes and transforms the whole thing right into a iciness wonderland does now not closing lengthy after the sun and the wind capture up with it.

Getting these kinds of snow shots requires a willingness to get out and begin shooting as soon because the snow has completed falling. Make positive which you are prepared for snow-included roads and trails and put together yourself thus.

snow, snow photography, photography, how to, winter photography, falling snow

You also can be bold and capture the snow even as it's far nevertheless falling. Longer shutter speeds will blur falling snow into vivid streaks, whilst shorter shutter speeds will show handiest spots of snow. If you want the massive, falling snow impact, use your flash. The flash will light up nearby falling snow and show it off higher than with out a flash.

If you're going to be outside photographing falling snow, you want to take a few fundamental precautions to preserve your camera secure and dry. The only approach is to apply a gallon plastic bag and reduce out one nook of the bag. Stick your lens thru this reduce out and use your lens hood to stable the bag across the camera and lens.

http://www.boostyourphotography.com/2014/01/snow.html
Simple gallon bag as snow safety for your digital camera.

Many sources additionally advocate bringing some other (intact) plastic bag with you whilst photographing out within the cold. When you are completed capturing, placed your digital camera into the bag, and close it securely even as you're nevertheless out of doors. Then, while you come in and your digital camera slowly adjusts to room temperature, any condensation will occur on the outside of the bag, rather than inner your digicam.

Follow the Light

As with any problem, the depth and route of the mild may have a massive impact to your snow pictures. Backlight will deliver shine and sparkle to more moderen snow, at the same time as early morning or overdue afternoon solar will bring long, dramatic shadows and viable silhouettes. Consider the 'appearance' you want to your snow photographs and pick out a time of day to be able to healthy that aim.

Snow also can upload drama to your sunrise and sundown pictures, because the white snow will often reflect or take on some of the tones of the encompassing sky. And speakme of the sky ?

snow, snow photography, photography, how to, winter photography, sunrise,
Four-shot landscape of sunrise over the skating rink.

Don't Forget the Sky

The sky can be a vital element of winter snow pix. There is a massive distinction in feeling and emotion among a vibrant, blue sky and an overcast, white one. For one, it's miles a great deal less complicated to get accurate exposures when taking pictures snow in opposition to a shiny blue sky. An overcast sky additionally manner that you will need wider apertures or longer shutter speeds to make amends for the decreased available mild.

Bottom photograph to be had for purchase.

When capturing snow beneath blue skies, you may need to remember adding a polarizer to your digital camera lens to in addition emphasize the intense blues within the sky. (Read more approximately how to enhance your photography by way of the use of a polarizer.) Remember while the usage of a polarizer that you will lose a forestall or greater of light and can need longer shutter speeds (or wider apertures) to compensate.

Snow Photography Summary

Take these few simple steps to dramatically improve your snow pictures. Start by using nailing the publicity: use exposure compensation to deliberately overexposure your photograph barely (advantageous values) to get the pure, white snow that you saw with your eyes. Get accessible and capture the snow while it is still falling or quickly after it has stopped, which will capture pure, pristine snow fields and heavily laden bushes. Think approximately the light and the time of day so one can get the shot you want, and don't forget the sky and use it on your benefit.

Want even more snow photography advice? Follow our "Winter Photography" board on Pinterest or follow all our boards on Pinterest for more photography ideas, inspirations, and "how to"s from across the web.

Boost Your Photography: Learn Your DSLR is now to be had from Amazon. Get the most out of your digicam with practical recommendation approximately the technical and innovative components of DSLR images with the intention to have you taking stunning pics proper away.