Showing posts with label Instant Idea. Show all posts

Sunday, August 30, 2020

Photography Article Fall Round Up|Photography Artist Statement

Just in time for Thanksgiving, it's the Fall Round Up: your one-stop spot for a look back at this fall's posts. Catch up on the previous round ups here:Spring and Summer.

Yes, Go Chasing Waterfalls

Musings:

  • Photography Is ... What is photography for you? Some thoughts about the importance of timing, patience, and luck.
  • Boost Your Photography: Set a Goal or Challenge - Learn how setting, reviewing, and revising a photography goal or challenge can help move you forward in your photography.
  • Photography Gifts for the Holidays and Where to Order Holiday Photography Gifts - Put your photography to good use this holiday season. Read about the wide variety of ways you can use your images to create memorable gifts for friends and family.
A collage mug is one of many ways you can use your photography for gifts.

For Beginners:

Explanations and overviews geared towards those wanting to get more out of their photography. Many of the 'Tips and Tricks' and 'Inspired Ideas' are also applicable.

  • Aperture and the F-Stop Conundrum - Confused about aperture? This article is the place to start. The rest of this mini-series divides the aperture section into three:What an Aperture of F/1.8 Can Do for You,The Middle Range Apertures: f/8 and f/11, andWhat an Aperture of F/22 Can Do for You.
  • Camera Lenses: What's In a Name? - An overview of camera lens naming conventions and what you need to know when looking for a new lens,Learn Your Lens: the lens itself - All about the functions and features of a lens, and Learn Your Lens: the accessories - Learn which camera lens accessories you need and how to use them.
  • Yes, You Need a 50 mm Lens - Find out why a 50 mm lens is a great upgrade, especially from your kit lens(es), and it's a great steal, priced around $100.
Comparison of changing apertures from the wide, middle, and narrow ends of the spectrum.

Tips and Tricks:

Advice for getting the most of your camera and photography

  • Zooming vs. Cropping: perspective in photography - Understand the differences between zooming vs. your lens, cropping afterwards, and the importance of changing your perspective.
  • Easy Photography Upgrade: get a remote shutter release - Around $6 for a remote can make a big impact in your photography.
  • Shoot a Successful Self-Portrait - Learn how to shoot a better selfie: how to focus and set the scene as well as a variety of ideas to try.
  • Improve your Fall Photography: use a polarizer - Get those blue skies you've always wanted. Learn how to use a circular polarizer.
  • Panning in Photography - Learn how to create panning shots with a frozen main subject and moving background.
  • Thankful ... for Food Photography - A collection of tips and tricks for improving your food photography shots.

Inspired Ideas:

How to make the shot with specific photography ideas

  • 50th Post and Six Month Blogoversary - Count down the Top 5 Most-Viewed Posts of the first 50
  • Make the Shot: Slow Sync Photography - Get a behind-the-scenes explanation of how to create your own ghostly images using the slow sync function of your on-camera flash.
  • Yes, Go Chasing Waterfalls - Suggestions and advice for what to bring and how best to shoot waterfalls with that long, silky water look.
  • Local Tourism: Photograph the Harvest - Find photographic inspiration in your local harvest. Visit a pick-your-own orchard or pumpkin patch.

Travel Photography

  • Photography Collections: start a collection - Consider a collage as a way to display travel memories. Unify your collage by focusing on a specific item or element, like full doors, door knobs, or even hearts.
  • Window on the World - Windows are a unique way of placing the viewer within the frame of your photograph. Consider paying attention to windows when you travel.

Stay Connected:

Don't miss a single post from Boost Your Photography

  • Follow along onFacebook -www.facebook.com/BoostYourPhotography.
  • Follow along onGoogle+ -Boost Your Photography on Google+ (or click the 'Follow' button near the top of the right-hand column.)
  • Follow along onTwitter -@archaeofrog .
  • Sign up to receive each new post by email. (The subscription box is in the right-hand column. Email addresses will never be sold or distributed.)
  • Subscribe using your favorite RSS reader. (Click the 'subscribe now' button in the right-hand column or typewww.boostyourphotography.com into your RSS reader.)

Saturday, August 29, 2020

Photography Article Guest Post: Sun Flare and Starbursts|Photography Artist Statement

Jump on over to Digital Photography School to study a guest publish that I even have written on Using Sun Flares and Starbursts to Create Stunning Images.

Here's another example to get you commenced:

Sun Flare created with a Late Fall Sun

Friday, August 28, 2020

Photography Article Shaped Bokeh|Photography Artist Statement

The first article on this series delivered you to All approximately Bokeh, and this second one will cowl the topic of fashioned bokeh. Shaped bokeh takes the idea of bokeh one step further through remodeling those out-of-focus circles of light into some other shape, with countless possibilities.

How to Create Shaped Bokeh: Supplies

This classic how-to publish for formed bokeh comes from DIY Photography, and it is enormously easy and inexpensive. (For the non-crafty among us, you may now also buy a Bokeh Masters package, created with the aid of them, for $25 USD.)

How to Create Easy Shaped Bokeh | Boost Your Photography

For supplies you may need the following:

  • A piece of black paper (thicker cardstock works best)
  • A rubber band
  • A piece of tape
  • Scissors
  • A 50mm lens

Seriously, that is sincerely it. An x-acto knife is beneficial for making the definitely small cuts, but I did my first few with a ordinary pair of scissors. You may also use a fashioned hollow puncher, if you wish.

The steps, you could basically intuit from looking on the photograph above. Cut out a duration of black cardstock, roll it round your lens to make a tube, and tape it together. Trace around the circumference of your lens/tube. Cut out that circle, adding approximately a half of inch or so all the manner around. Then, cut a chain of notches into the circle (returned to the authentic, traced circle). Fold the notches returned. You can then vicinity the circle over your lens and the tube and stable it in vicinity with a rubber band across the tube and the folded down notches.

Example shapes: superstar, snowflake, and coronary heart

But yes, we skipped the most important step: the shape. First, decide what shape you want for your shaped bokeh filter. For an introductory 50mm kit lens, you can make your shape up about 17mm long. (Here's the article on the math behind that, if you are curious.) Center your shape directly in the middle of the circle (fold the circle in half in two places if you want to easily find the exact center). All sorts of shapes can work, as long as you can easily and neatly cut it out at that small of a size. (The complicated-looking snowflake was cut using an x-acto knife.)

Shooting Shaped Bokeh

Now which you are well-armed together with your formed bokeh-making tube and filter out(s), you're geared up to begin taking pictures. Many of the ideas are the same as while shooting any type of bokeh. You will need to shoot with your lens extensive open (the widest aperture to be had, like f/1.8). You will want to have your challenge fairly near the digicam and the background at least two times as far away. You will need a historical past so as to render massive, circular bokeh, which is why the vacation season is an ideal time for shaped bokeh. Hang up a few strands of lighting fixtures or move stand in front of your neighbor's tree or house, if you choose.

The simplest manner to shoot formed bokeh is to compose your shot earlier than placing the form in front of your lens. A tripod is mainly helpful so that you can consciousness in your subject first and then transfer your lens into manual awareness, so that it will lock the point of interest in place. Then you could positioned the form over your lens, secure the rubber band, and now not have to worry about your camera trying to find focus via the narrow shape.

Keep in mind that your shaped bokeh will grow to be being a great deal smaller than the unique bokeh circles. Unless you're able to reduce your form to precisely the maximum allowable size, you will lose a number of the size based totally on how small you have got made your shape. The handiest compositional distinction between the two pics below is that the shaped bokeh clear out became used for the second one. The distances between the difficulty, the digicam, and the background (a lit Christmas tree) remained the same.

Another issue with using a formed bokeh clear out is that it'll further reduce down on the quantity of mild reaching your sensor. Because you may already be capturing together with your aperture huge open, you may want to use an extended shutter pace or growth the ISO to compensate. (Another purpose a tripod is reachable.) You can also want to don't forget the usage of a flash to better remove darkness from your situation. The background will no longer need the flash, when you consider that it's far already shiny and manufactured from lights. With the Chimay photographs above, the shutter pace improved from 1/eighth of a 2d for the circle bokeh to 2 seconds for the shaped bokeh. No flash became used.

For the snowman shot, under, the digital camera's integrated flash became used to light up the snowman. The standard settings for the shot were ISO 100, f/1.Eight, and six seconds. The bits of formed bokeh snowflakes creeping around the snowman had been a end result of my lack of ability to maintain him perfectly constant for the overall six seconds. A steady challenge (or some thing to preserve your subject consistent) also can be beneficial.

Snowman and a subject of Snow-Bokeh

Experiment with specific distances, each among the camera and the problem and between the situation and the history. The collection of snap shots below demonstrates the impact of moving closer or farther far from the history. Moving toward the historical past will lead to less overlap among your shapes, but you'll have much less of the shapes, as much less lights are on your composition. Moving farther far from the historical past will purpose a lot more overlap of the shapes and there could be plenty more of them.

The two pix above display the effect of transferring the concern (and the aircraft of recognition) in the direction of the digicam. In each pix, the camera and heritage stayed inside the equal location, whilst the plane of attention moved a foot or so in the direction of the camera for the second picture. Moving the plane of recognition that a lot closer to the digital camera additionally led to an increase in the size of the bokeh shapes.

Summary

Shaped bokeh is a a laugh and clean manner to make creative snap shots. There are endless possibilities, and you could effortlessly make new bokeh filters in a remember of mins. What higher way to have a good time and percentage the matters you adore?

Have a favorite formed bokeh shot you've taken? Share it inside the feedback beneath!

Photography Article How to Photograph Outdoor Holiday Lights|Photography Artist Statement

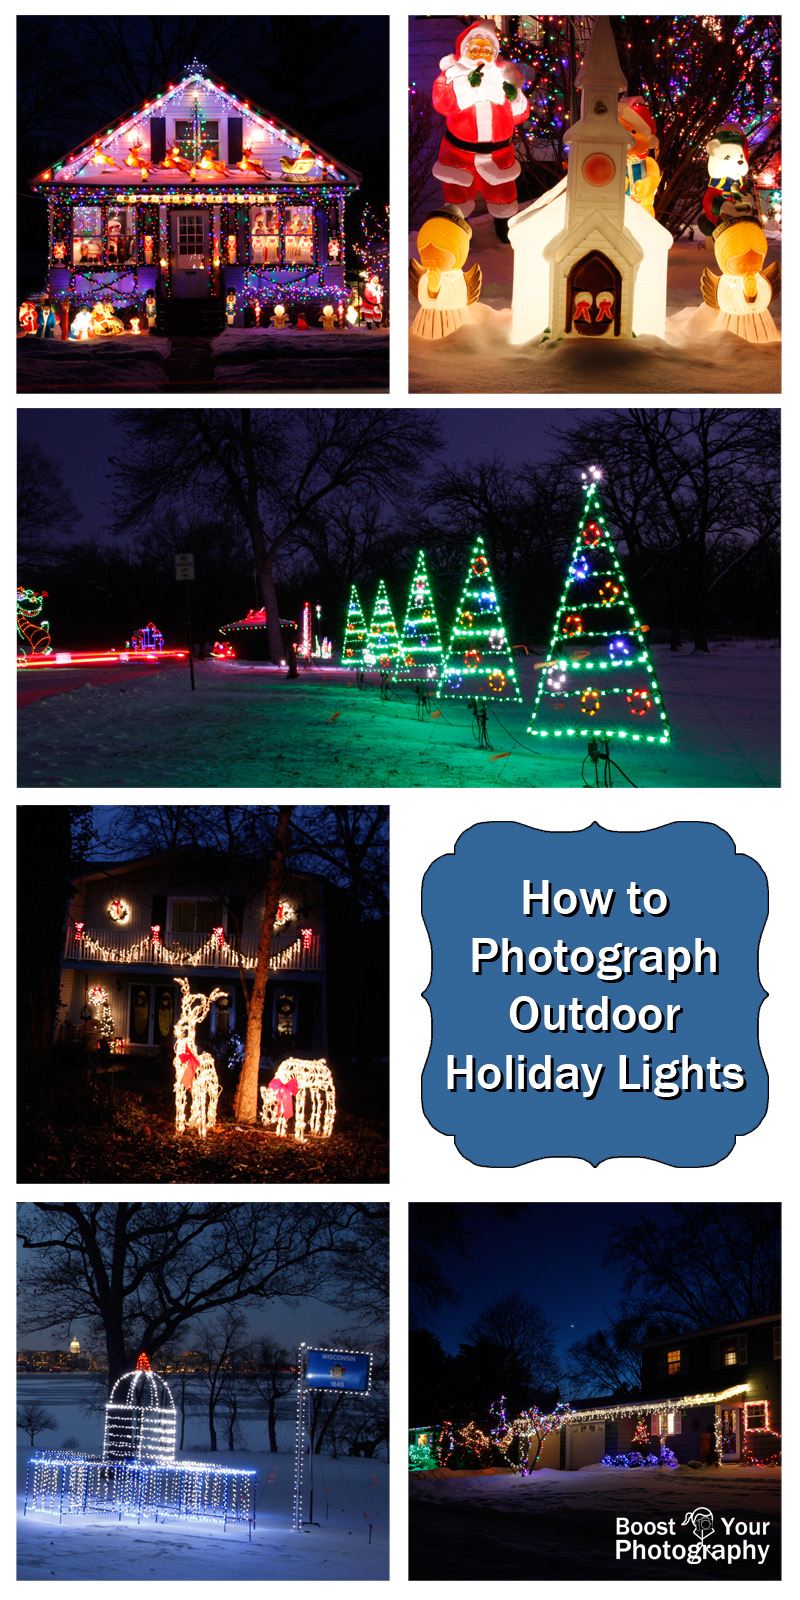
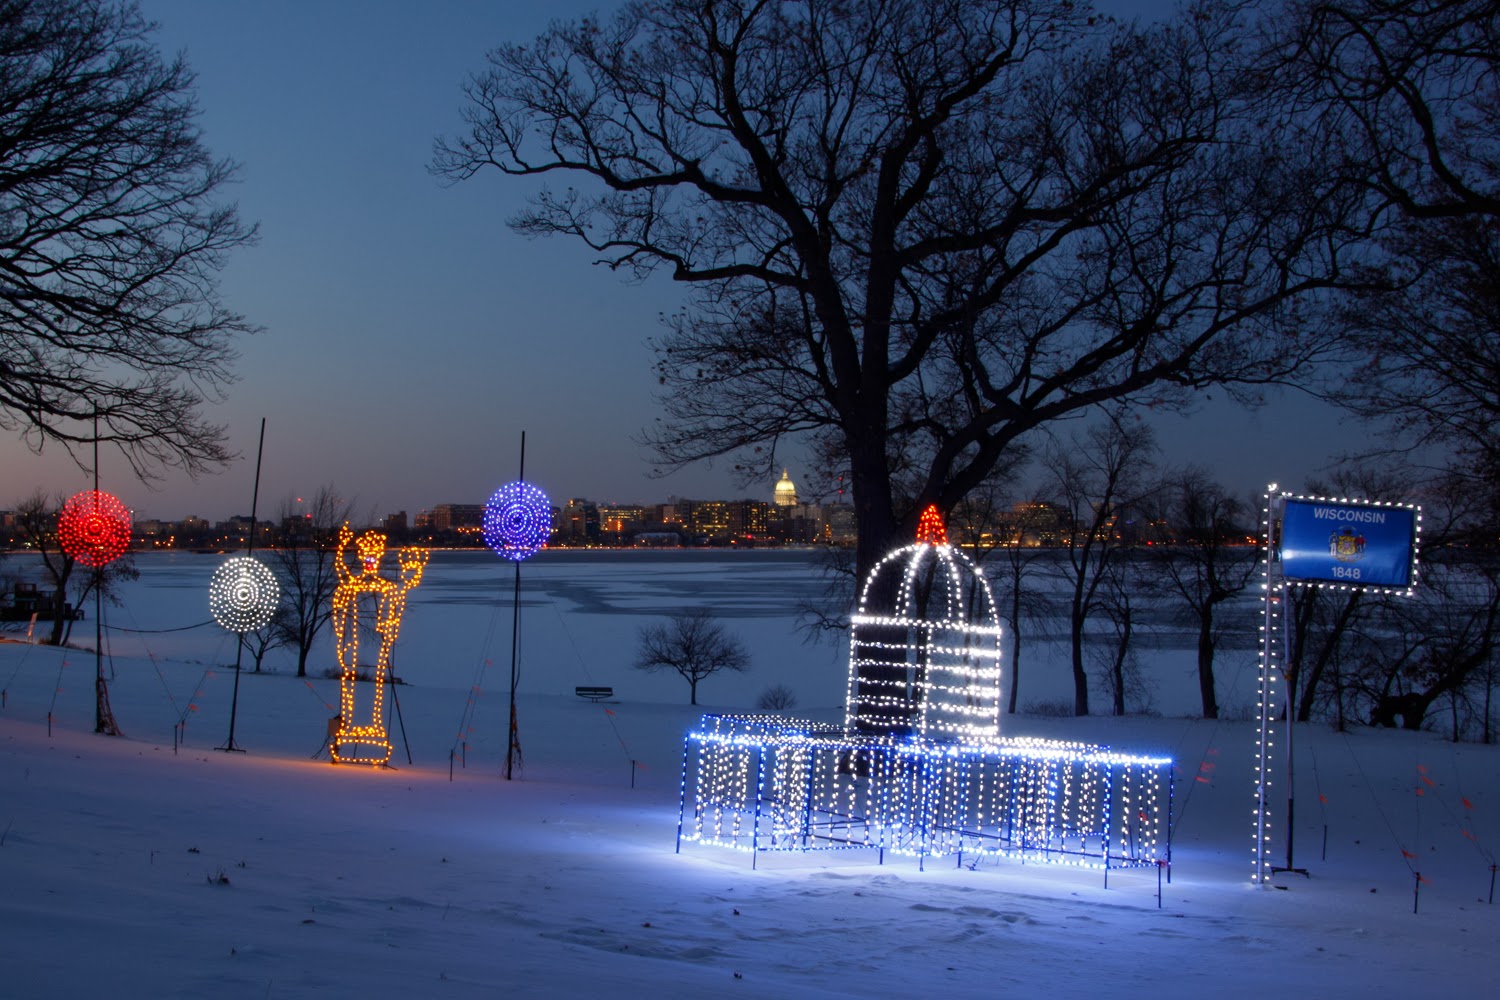
'Tis the season, at the least here in the US, for domestic proprietors to brightly festoon their homes in full-size quantities of small, twinkling lighting. Whether you recollect them Christmas lighting fixtures, vacation lighting fixtures, or just a a laugh excuse to run up the power bill, this article will surrender the hints you need to take excellent shots of outdoor holiday lighting fixtures and mild shows.
holiday lights, Christmas lights, photography, how to

Equipment

A tripod is a should for tack-sharp night time photos, and a far flung shutter launch is useful. (If you do not have a faraway, you can use the 2-2nd or 10-2nd countdown characteristic in your camera. Corded remotes, but, are sincerely cheaper and worth the few bucks to choose up. Read greater approximately them here.) You can use a point-and-shoot digicam on night or long publicity settings, but you may have the maximum control over the final picture if you shoot with a DSLR camera.

Settings

I choose to shoot holiday lights in aperture precedence mode at ISO 100 with a slim aperture, like f/22. This can create a starburst effect, turning every tiny light right into a miniature megastar. (Read more approximately how to create starbursts in my visitor submit over at Digital Photography School.) Even in case you do not get full starbursts for every light, f/22 will assist accentuate the glow.

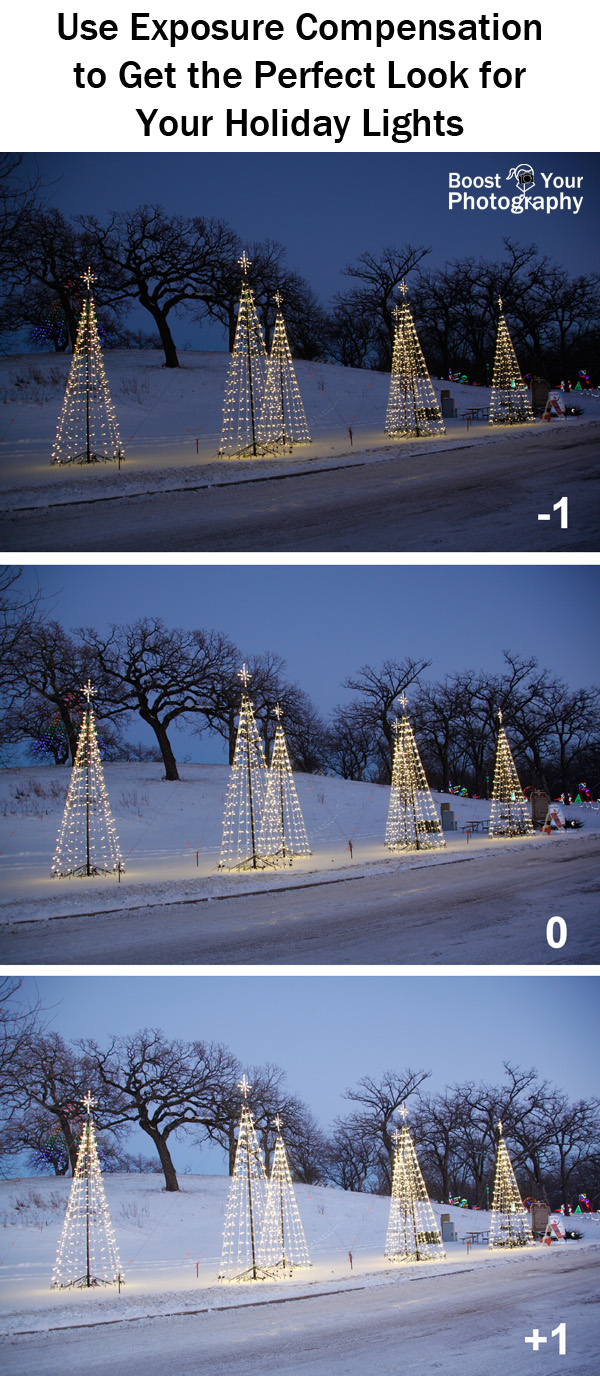
I actually have determined that Christmas lights regularly appearance exceptional when shot a bit underexposed, as you still want some thing of a 'night time' look to the very last image and do not want your digicam's sensor picking a shutter speed in an effort to make the complete image appearance as vibrant as day. To that stop, I suggest using exposure repayment and underexposing your photo by one complete stop. (You can discover the way to try this on most factor-and-shoot cameras if you appearance deeply enough into the menus.)

The different alternative is to shoot bracketed and have the digicam take a sequence of images at extraordinary exposure repayment values. If you are the usage of this selection, I advise beginning with the values of -2, -1, and 0. This will give you a range of options to pick out from later.
Use Exposure Compensation to Get the Perfect Look for Your Holiday Lights | Boost Your Photography

Finally, you could want to don't forget taking your white stability (WB) off of Auto. If you shoot in RAW (or RAW jpg), then you may go away the WB on Auto and select the look you like fine in put up-processing. If you shoot in only JPEG, however, I endorse converting your white stability to tungsten or fluorescent. These will keep the skies blue, render the colors in the lighting as it should be, and no longer add a warm yellow or daytime glow to your snap shots. You may additionally need to shoot a series of pix at exclusive white balances after which determine. The set of pictures beneath had been shot consecutively the usage of a tripod, and the white stability changed into the best variable changed. You can see that the tungsten and fluorescent settings hold the snow and the houses white, whilst the opposite settings impart a yellow-orange glow to a great deal of the scene.
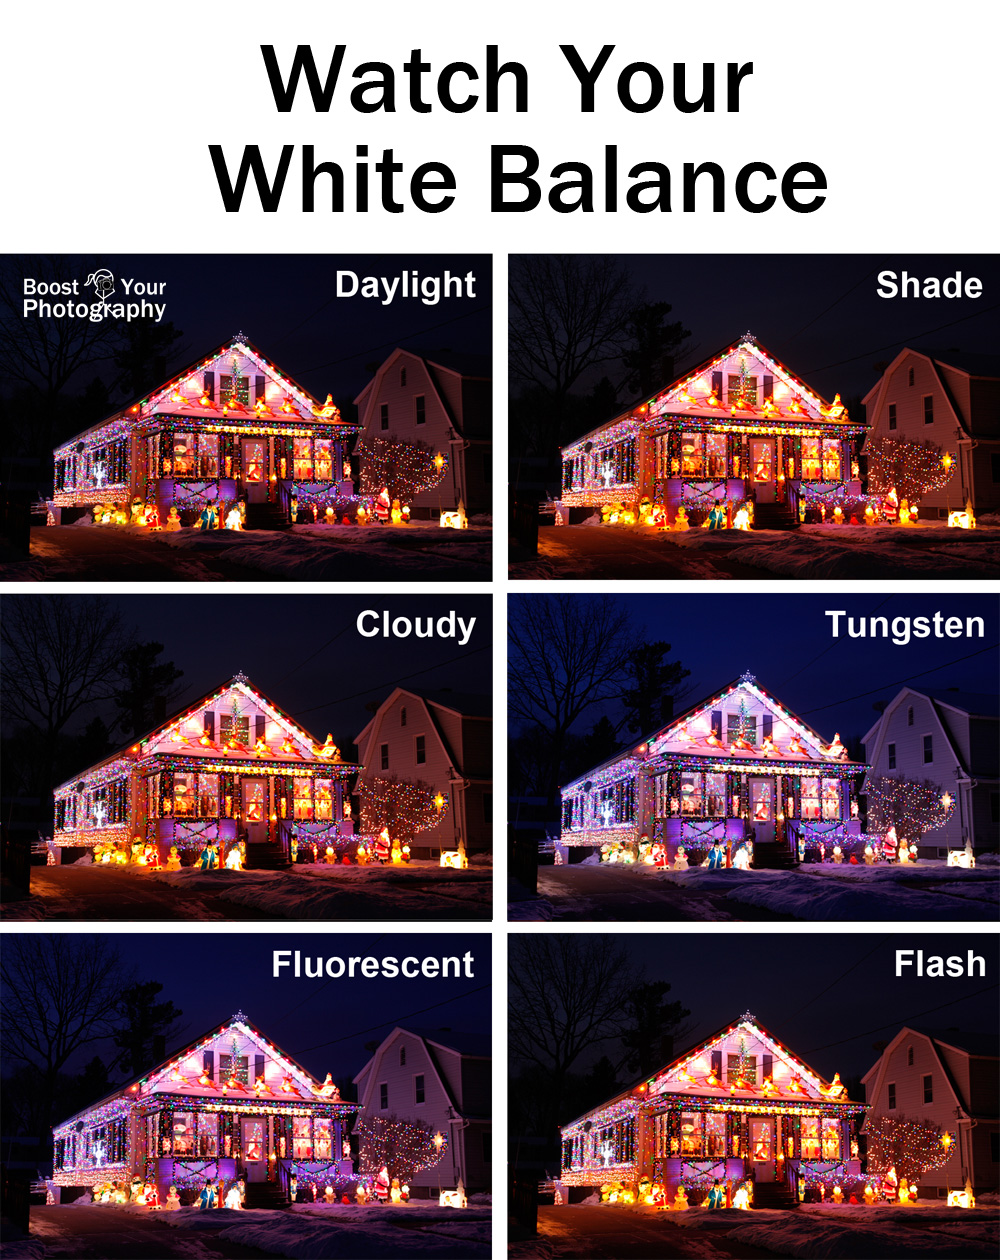
Watch Your White Balance with Holiday Lights | Boost Your Photography
Comparison of White Balance (click on right here to peer large model on Flickr)

Timing

Timing is the whole thing for making it an iconic vacation lighting shot and now not just every other photograph. The key is to take your snap shots for the duration of the blue hour. The blue hour is the period of time (lasting about an hour) that happens shortly before the sun starts offevolved to rise in the morning and soon after the solar has set at night time. During the blue hour, the sky becomes a deep blue color that serves as an excellent evaluation to the glow of Christmas lighting. Your digicam will see a document this blue coloration deeply and extra vibrantly than it may seem in your eyes, so that you can preserve capturing even after the sky has started out to look 'black' to you.
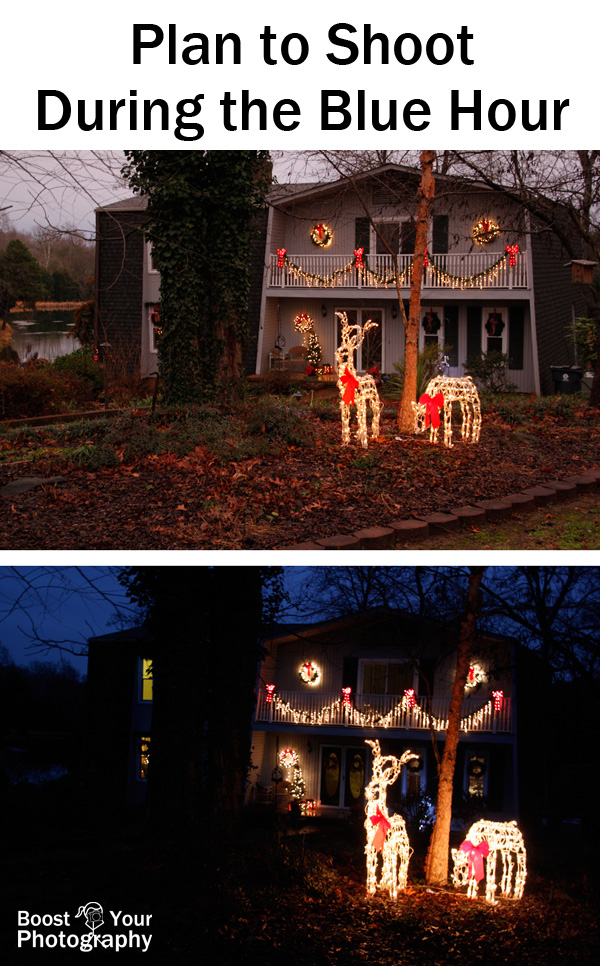
Plan to Shoot Holiday Lights during the Blue Hour | Boost Your Photography
These pictures were taken handiest 15 minutes apart.

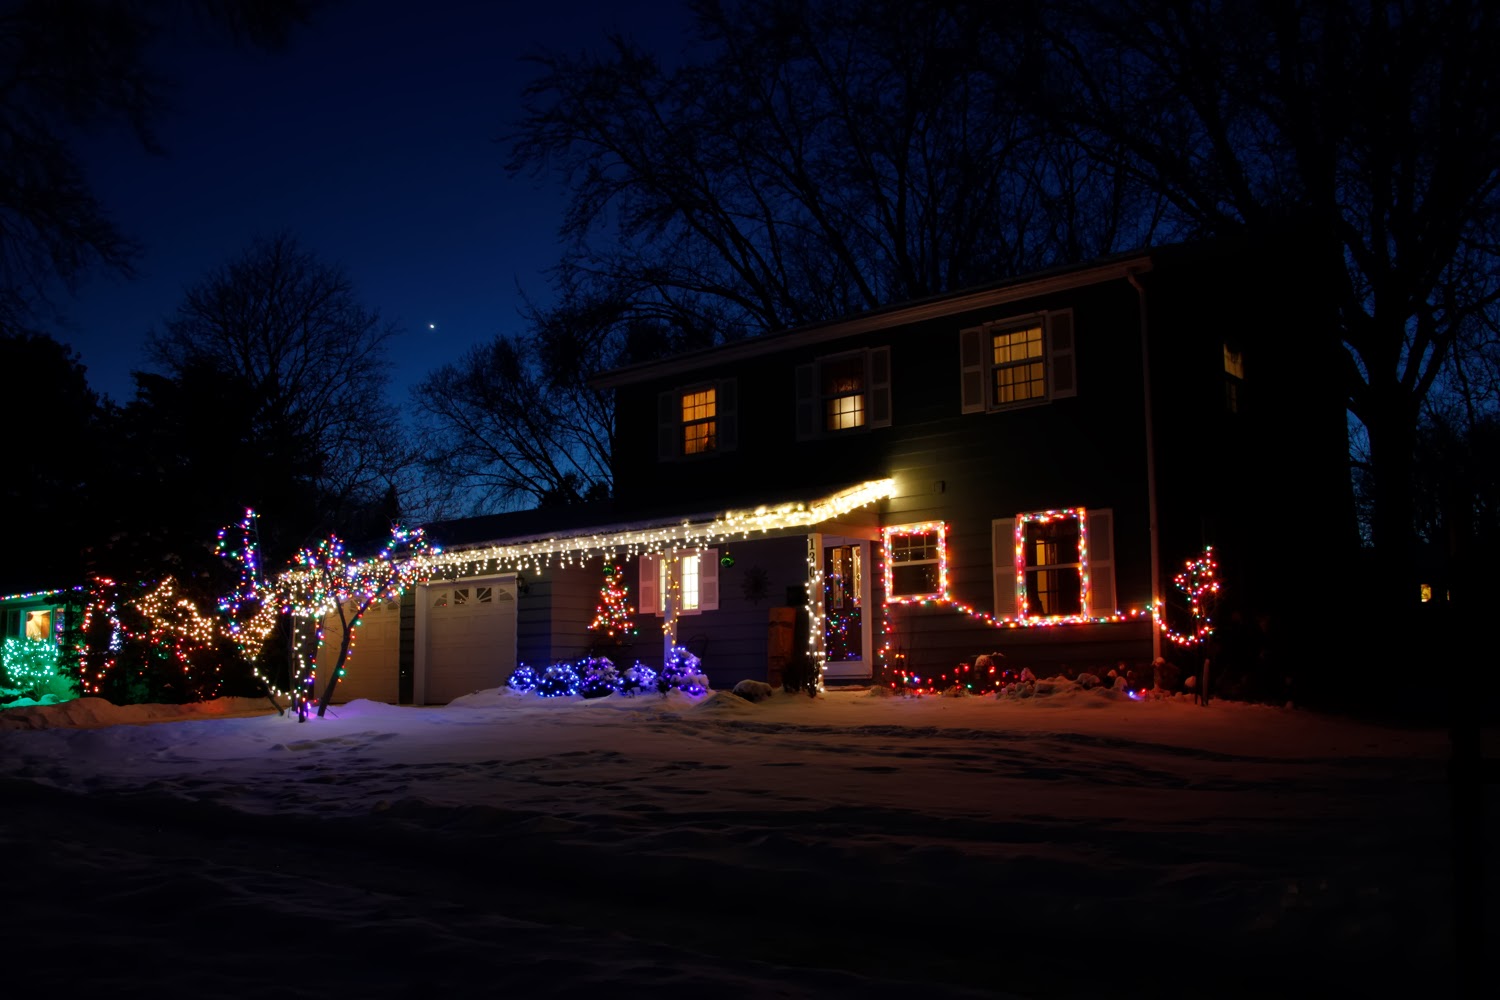
You also want to try and shoot at some stage in a night with clear skies. A clean sky permits for that deep blue colour, unfiltered. Scattered clouds make for superb sunsets however now not for first rate blue skies. A absolutely overcast sky will genuinely appearance pretty a bit yellow or orange, as it will reflect returned the light pollutants from any surrounding towns or urban areas. The other advantage of clean skies is which you might also be able to report stars, moon, or planets at the side of your holiday lighting fixtures.
holiday lights, Christmas lights, photography, how to, blue hour

There are many easy ways to figure out your timing for such shots. You can use a site like Blue Hour Site to get approximate timings for the blue hour in your area, or you can use a site like Time and Date or the Photographers' Ephemeris to determine the sunrise and sunset times. I have found that 15-20 minutes after sunset is the beginning of the best time for shooting holiday lights against stunning blue skies.

Composition

There are an endless quantity of approaches to photo and display off Christmas and excursion lights. The most conventional, of path, could be a straight on or simply off-focused architecturally pushed technique, wherein you encompass the complete house and are shooting from tripod or eye-degree. If you want the partitions of your house to appear instantly, take the picture from farther away (like throughout the street) and zoom in on the house. This will keep away from the distortion common in structure if you are too close to the constructing you're capturing.
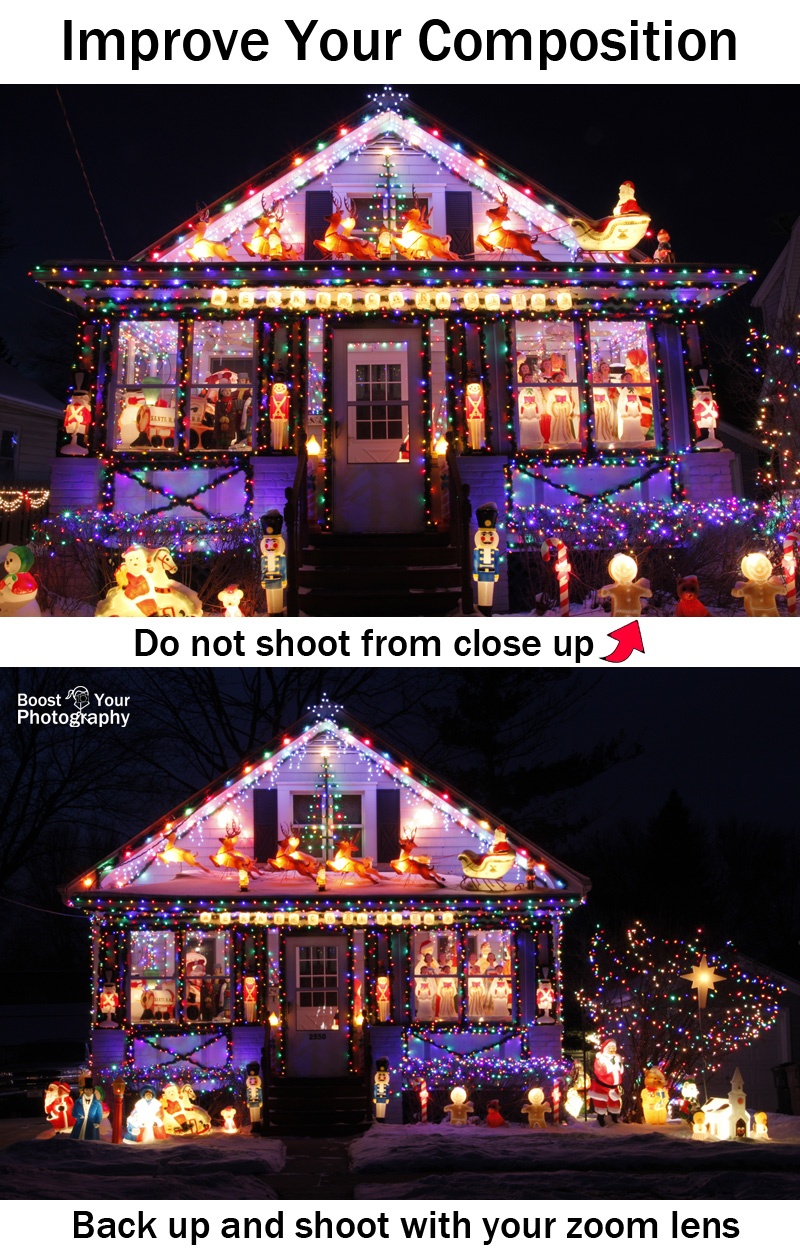
You can also go for a less traditional look. Rather than such as the whole house, pick a particular phase or vicinity of hobby. Narrowing down the point of interest helps the viewer to look and admire all the information gift inside the scene, which might be misplaced in a broader composition.
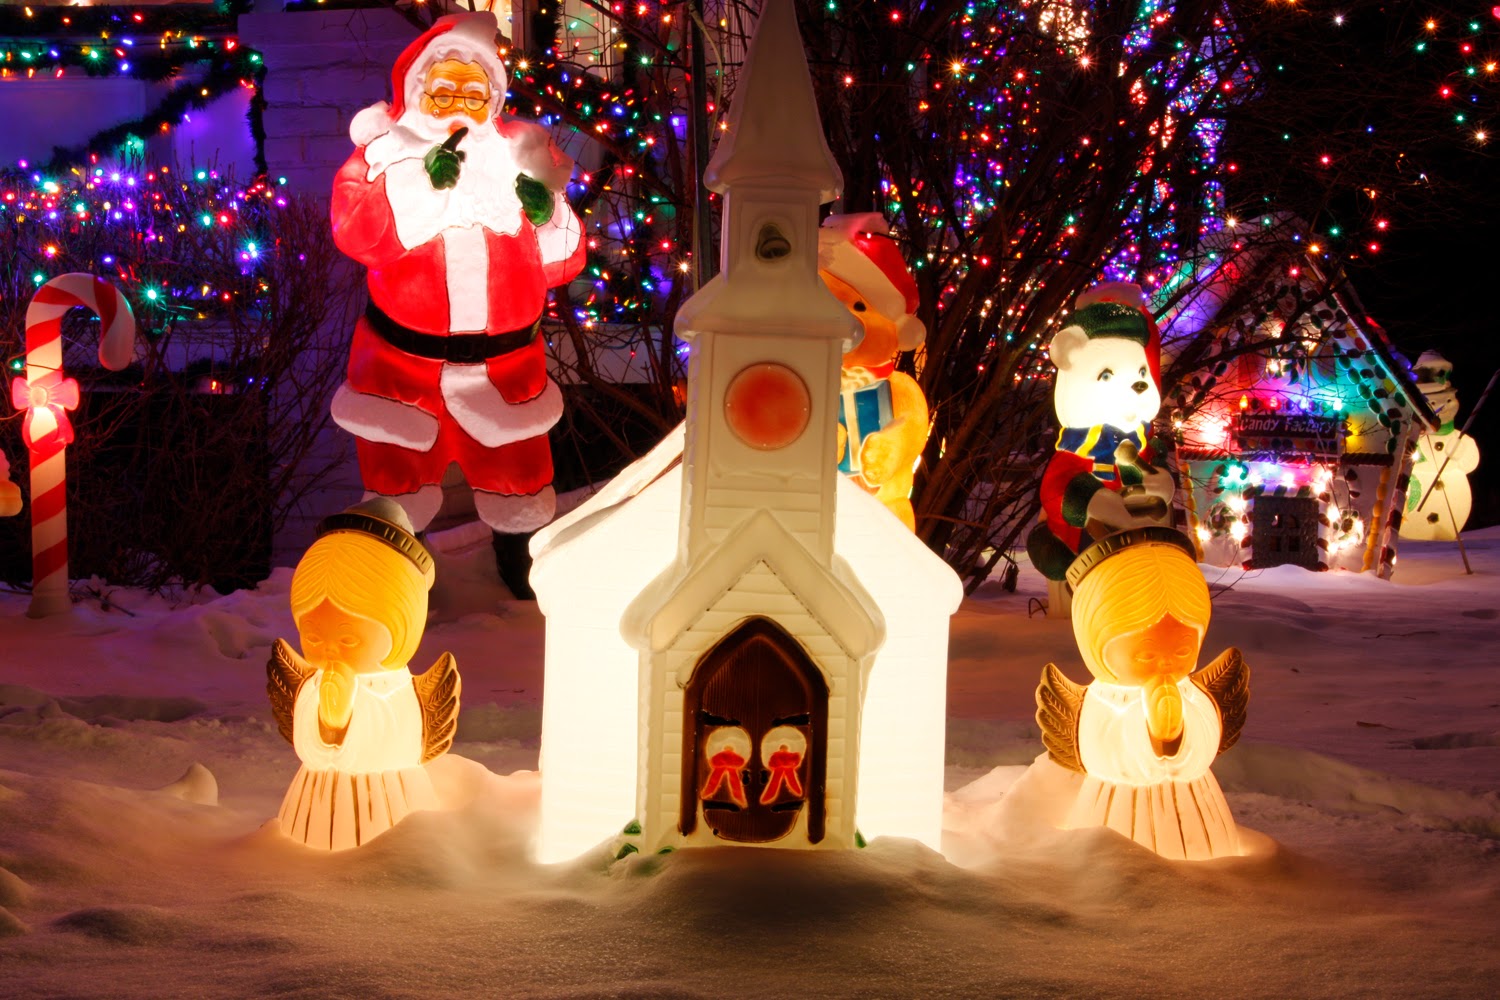
holiday lights, Christmas lights, photography, how to, Santa, church

Think approximately adding other styles of lighting into the shot as properly. For homes on busier streets, you could need to shoot a much broader factor of view and consist of the mild trails of passing cars. These more lights will upload interest and a experience of movement to the image.
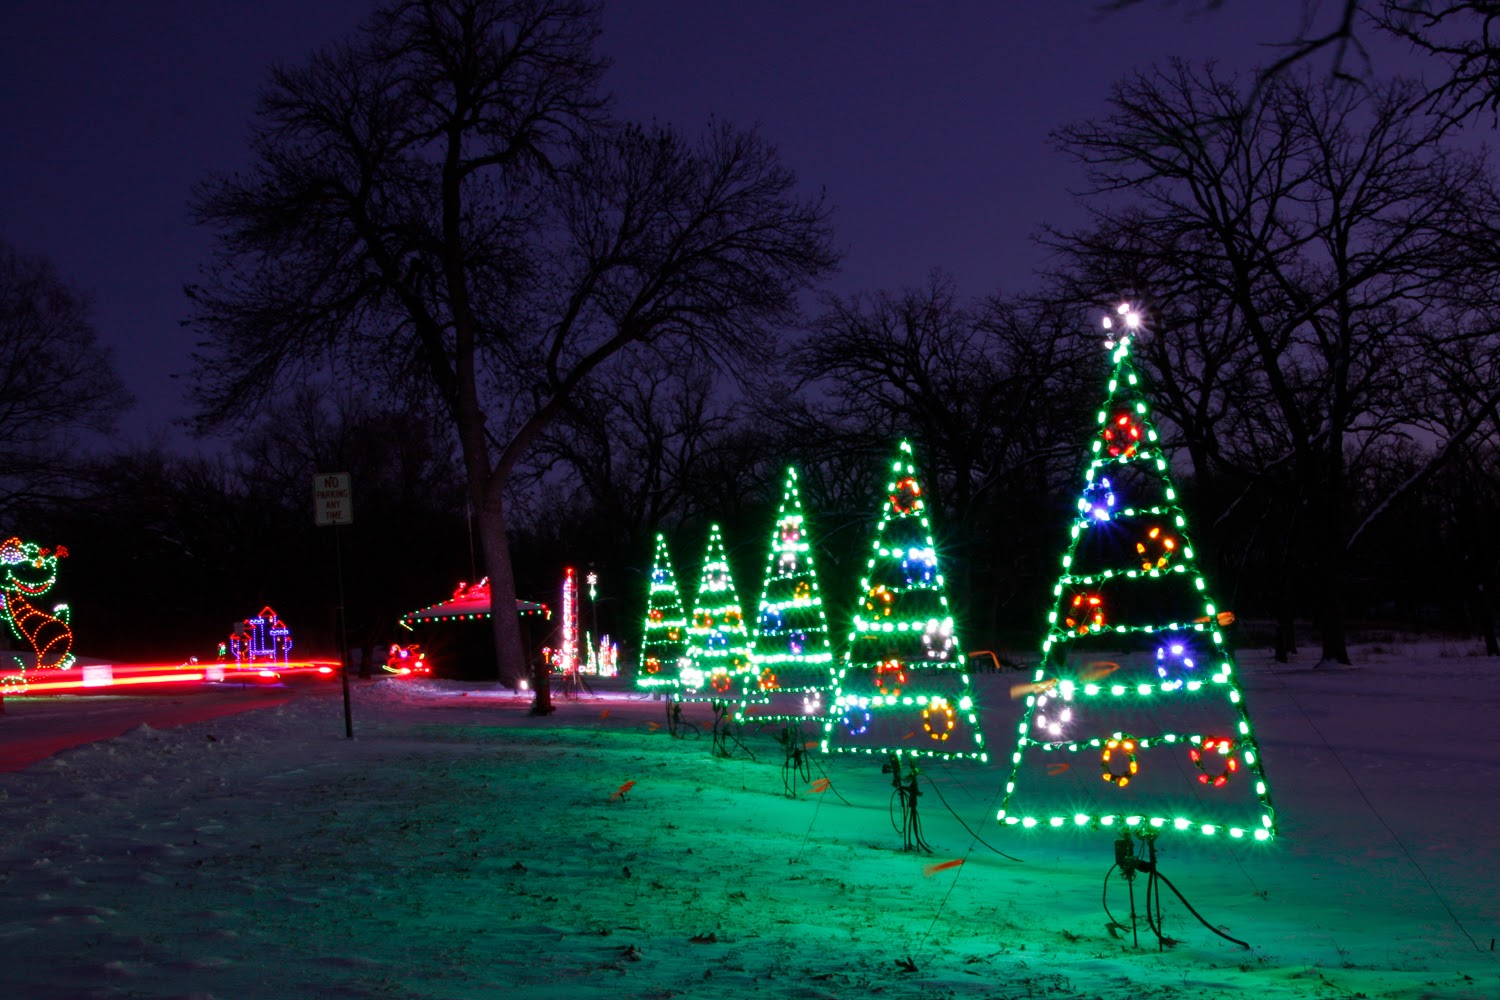
holiday lights, Christmas lights, photography, how to

Finishing Touches for Houses

If you really want an above-and-beyond Christmas or vacation lighting fixtures shot, there are a few finishing touches in terms of lights and lighting fixtures. (A sparkling dusting of snow is continually favored too.) If you want your own home to look warm and welcoming, you should switch on the interior lighting in order that the home windows glow brightly. This additionally applies to porch lighting or street lamps. Their warm sparkling will upload to the general atmosphere of the very last photo.
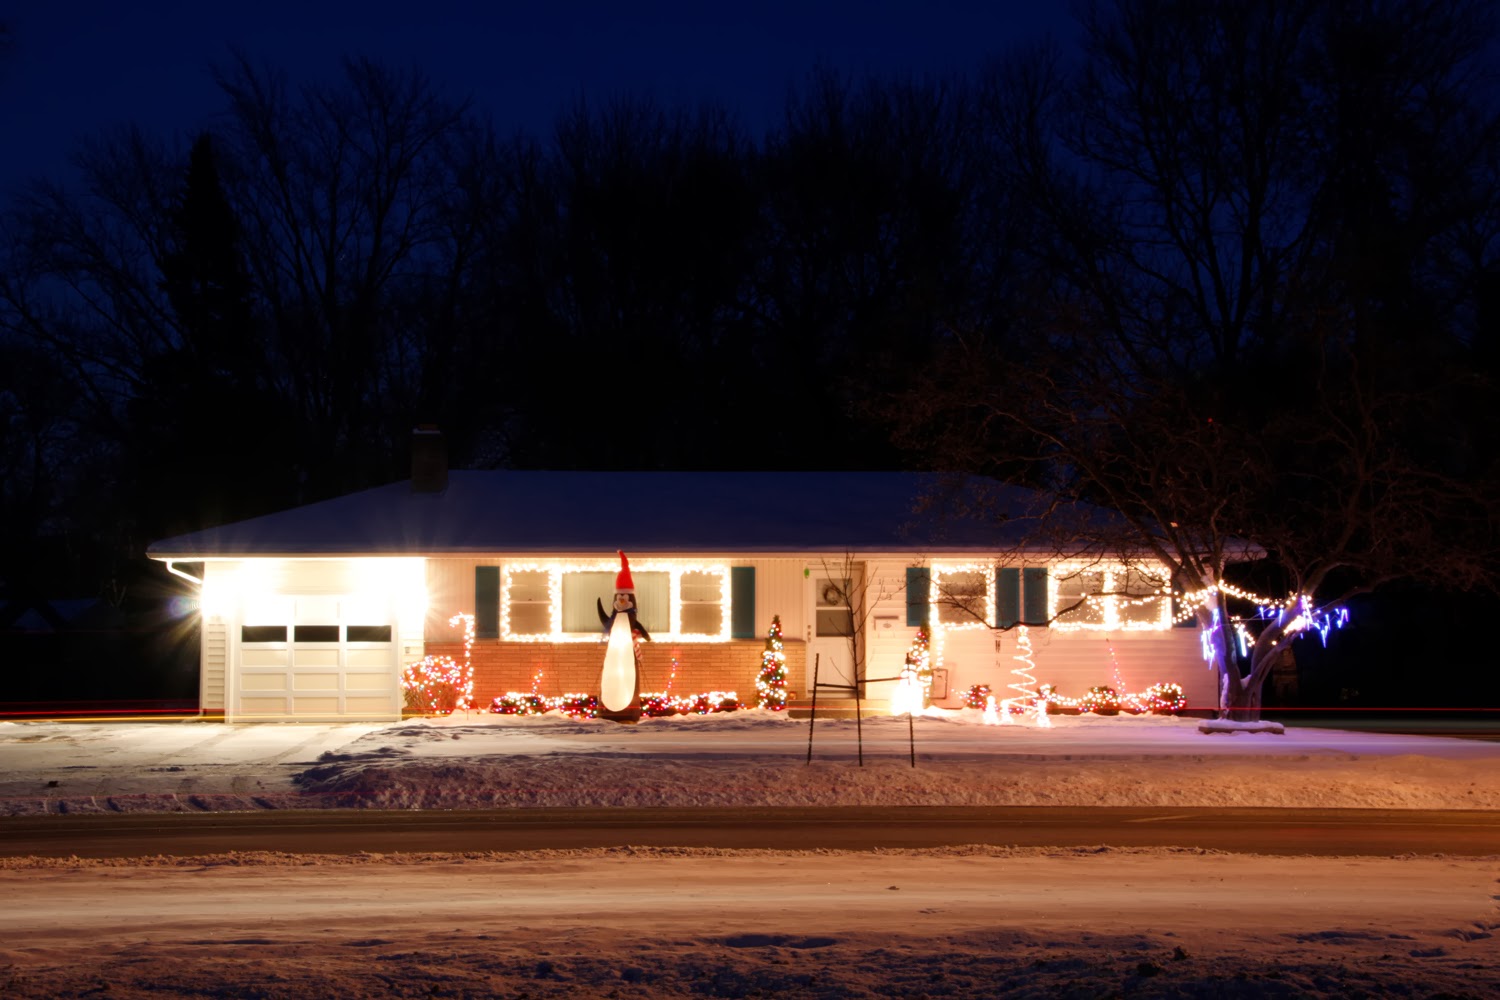
Here the storage lighting are too vibrant, but the indoors lighting fixtures add a warm glow.

Consider, however, turning off or temporarily disabling any flood lights or movement sensor lights that do not add to the overall composition. Flood lighting fixtures lights a house may add to the holiday impact, however shiny movement lighting streaming out out of your storage will simplest blow out within the photograph and make everything too brilliant, as in the photo above.

These appear to be nit-picky sorts of matters, but, as you could see from the examples, they could make a large impact on your standard photo.

Summary

Christmas and holiday lights are a photographic gold mine this time of year. If you take a bit bit of time to plan out your shot (shoot during the blue hour, turn on the interior lights, and produce alongside your tripod and far off), you'll locate it clean to seize memorable and delightful photographs of your favorite lighting presentations. Enjoy!

Boost Your Photography: Learn Your DSLR is now to be had from Amazon. Get the maximum out of your digital camera with realistic advice approximately the technical and innovative factors of DSLR photography that will have you ever taking lovely images right away.

Wednesday, August 26, 2020

Photography Article Creative Christmastime Photography|Photography Artist Statement

Christmas is a vacation of love and lighting and presents many opportunities for thrilling and innovative pics. This publish is supposed to inspire your own Christmastime pics with some thoughts and examples of creative Christmas-themed pix (and to give you a few ideas of pics you can take without bothering the rest of the family!).

Make the Tree Shine

You can upload an additional sparkle for your Christmas tree through turning the lighting fixtures into starbursts. You will need a tripod to maintain the digital camera steady, and a far flung shutter release will assist. Use a extensive attitude lens, which include 18 mm. In aperture priority mode, set an ISO of one hundred and an aperture of f/22. This narrow aperture will motive each miniature light to be rendered as a starburst. Read greater about starbursts in my visitor put up on Digital Photography School.

Go for Silhouette

You can use just the glow of the Christmas tree to create exciting silhouettes. This is a exquisite technique to apply with children as well, as the glow of the lighting mirrors the excitement for Christmas on their faces. Expose the scene for the Christmas tree and glow, before positioning the character or folks for the silhouettes. (Read greater on Explaining Exposure and Exposure Compensation.) Try to use a mid-range or slender aperture to make bigger the glow and starburst effect. The image above turned into shot at ISO 100, f/eight, and a shutter velocity of 3.2 seconds. (Trying to get f/22 might had been a miles, lots longer shutter speed, and it'd had been tough for the challenge to keep nonetheless that long with out blur turning into glaring in the very last photograph.)

Use Bokeh

Two earlier posts this month explored the idea of bokeh and how to use it creatively in photographs: All about Bokeh and Shaped Bokeh. Christmas trees and other strings of Christmas lights offer an easy bokeh-filled background. You will need a lens with a wide aperture (like f/1.8 or f/3.5) for best results. For more details, read the previous posts.

In this photograph, the whole tree is used as a bokeh heritage for the statue. The implied shape of the tree is visible in the patterning of the bokeh and serves to shape a connection between the two figures sporting domestic their Christmas tree and the actual tree in the historical past. Using the complete tree as a bokeh shape could make an exciting backdrop for plenty sorts of pictures.

Capture the Whole House

Outdoor vacation lighting fixtures are another possible Christmas pictures problem. Plan to photograph the lighting fixtures on a clear night at some point of the Blue Hour, which starts about 15-20 minutes after sunset. Read all of the information within the submit on How to Photograph Outdoor Holiday Lights.

Focus on the Details

Christmas decorations and traditions make notable topics for a nevertheless existence. Here, the Christmas playing cards and Christmas cookies are complemented by way of a glowing association of embellishes and lights. Think about proposing a memorable or giant ornament in its personal image. Below is a small vignette created with miniature Christmas homes and characters, made greater unique as this turned into taken the primary Christmas after I received those from my grandmother.

Remember to Kick Back and Enjoy It

And of path, don't forget that Christmas is likewise a time to sit returned, loosen up, and experience the holiday, surrounded by means of human beings you like. Wishing you and yours a completely Merry Christmas!

Creative Christmastime Photography | Boost Your Photography

Boost Your Photography: Learn Your DSLR is now to be had from Amazon. Get the most from your digital camera with realistic recommendation about the technical and creative factors of DSLR pictures so as to have you ever taking lovely pictures proper away.

Tuesday, August 25, 2020

Photography Article Top 5 Guest Posts on Photography|Photography Artist Statement

The fourth submit in our Top five series will test the Top five Photography Posts that I have posted as guest posts on different web web sites.

#five: Jumpstart Your Photography: Start a 365 Project

This post on Starting a 365 Project just went live yesterday over at Digital Photography School, which is why I am slotting it in at the lowly number 5 in this countdown. I am now into my fourth year of participating in a 365 Project, and I honestly think it is the best thing you can do to make an immediate and lasting impact in your photography. Read more in the full post: Jumpstart Your Photography: Start a 365 Project. Still curious? You can find my 365Project athttp://365project.org/archaeofrog/365 .

#4: Inexpensive Close-Up Photography: Extension Tubes

http://www.boostyourphotography.com/2013/04/inexpensive-close-up-photography.html

Close-up or macro pictures is a manner of searching at the small information and wonders of the sector through pictures. This put up was the third of a sequence of four articles that I did for the photography web website Photokonnexion. Extension tubes screw in between your lens and the digital camera body, allowing you to focus and get your digicam towards your subject, which then makes your situation noticeably larger for your final photo. Read greater about how to use extension tubes inside the complete article right here.

#3: Inexpensive Close-Up Photography: Close-Up Lenses

http://www.boostyourphotography.com/2013/03/inexpensive-close-up-photography-close.html

This article on close-up lenses was the second one in my series of 4 articles on close-up and macro pictures that first seemed at the net site Photokonnexion. Close-up lenses, like filters, screw on to the the front of your existing lens. They can help you attention more closely in your subject, making it larger for your final photo. Read more approximately how to use near-up lenses inside the full article here.

#2: Inexpensive Close-Up Photography: Tips and Tricks

http://www.boostyourphotography.com/2013/04/macro-and-close-up-photography-tips-and.html

This post became the realization to my four-component collection on near-up and macro pictures that become posted on the internet website online Photokonnexion. This article focused at the settings and strategies recommended to obtain the quality outcomes, whether or not you are the use of extension tubes, near up lenses, reverse rings, or a devoted macro lens. Read the whole article on Inexpensive Close-Up Photography: Tips and Tricks for all of the details.

#1: Using Sun Flares and Starbursts to Create Dramatic Images

http://digital-photography-school.com/using-sun-flares-starbursts-create-stunning-images

... And the top post of my visitor articles that appeared on different web sites changed into this one on Using Sun Flares and Starbursts to Create Dramatic Images, which changed into published at the web site Digital Photography School. This publish lays out the timing techniques and the digital camera settings that will help you obtain massive, dramatic solar flares and starbursts, the use of the camera and equipment you already have. Both make for impactful and uncommon pics.

Catch up on the relaxation of our Top 5 roundup of Top 5 posts:

  • Top 5 Travel Photography Posts
  • Top 5 Informational Photography Posts
  • Top 5 Posts with Instant Inspiration Ideas for Photography
  • Top 5 "How To" Photography Posts

Boost Your Photography: Learn Your DSLR is now to be had from Amazon. Get the maximum out of your digital camera with sensible advice about the technical and creative aspects of DSLR photography so as to have you ever taking stunning pics proper away.

Monday, August 24, 2020

Photography Article How to Photograph Frozen Bubbles|Photography Artist Statement

We interrupt our look-returned on the Top 5 Top five posts of closing year to convey you ...

bubbles, frozen bubbles, frozen bubble photography, how to, photography

There has been a chain of photographs making the rounds of social media sites of frozen bubbles with problematic, frost-like styles (as visible here:http://www.Boredpanda.Com/frozen-bubbles-wintry weather-pictures-angela-kelly/). Since it's been ridiculously cold here inside the Upper Midwest, what better risk to try and see the way to reflect such shots. The detailed the way to description is below.

Supplies

The resources are pretty primary for growing and photographing bubbles. The predominant element, of direction, is what you'll use to make the bubbles. I used standard, save-sold bubble answer, whilst the unique photographer used a homemade solution of dish soap, karo syrup, and water. Use what you have.

You will also want the functionality to take near-up or macro snap shots. You can use a devoted macro lens, just like the Canon 100mm macro, when you have it, or you can use inexpensive macro alternatives like close-up lenses (pictured, available on line for much less than $15USD), which permit you to change the minimal focusing distance of your lens and get toward your concern. I used a 2 near-up lens on my 50mm f/1.8 lens for all of the photographs in this post.

Finally, be sure that you're safely organized for the weather. Temperatures were right around 0F after I turned into taking pictures, so I made sure to double layer my gloves, sporting both the knit pair proven above and a couple of down mittens that could fold lower back to loose my fingers as needed. Be positive you've got a heat coat, pants, headscarf, hat, etc. Consider attempting this technique just outdoor of a heat house or building so you can speedy get interior if you get cold or spill bubble solution all over your gloves, and many others.

Technique for Blowing and Photographing Frozen Bubbles

bubbles, frozen bubbles, frozen bubble photography, how to, photography

The keys to blowing and then photographing frozen bubbles are patience and a piece of practice. Expect the majority of your bubbles to burst, both right now after being blown or once they hit the floor. While the bubbles can be freezing at they fall, they're still in all likelihood to pop after they impact the ground. You additionally want to beware of wind. Calm situations will make it much easier as a way to keep and corral your bubbles.

I had the exceptional consequences with bubbles that I was capable of 'recapture' at the bubble blowing wand. This allowed them the time to slowly freeze over and additionally gave me the option to move them round to get a better heritage for photographing. Even at under zero temperatures, it took longer than I expected for the bubbles to absolutely freeze over. Expect to be maintaining onto them for a full minute or more.

bubbles, frozen bubbles, frozen bubble photography, how to, photography
Even a burst bubble can be exciting.

I highly suggest working towards your bubble blowing, catching, and photographing approach interior first. For me, I selected to preserve the bubble answer in my right hand and to dip and maintain the wand with my left. I kept my camera slung diagonally throughout my chest, with the digicam round to the returned (to avoid dripping any bubble solution on it). Once I had a bubble successfully stuck and freezing, then I should set down the bubble answer, scoop up my digicam, and begin capturing with my right hand handiest.

For digicam settings, I chose to shot in Shutter Priority Mode (Tv on Canon, S on Nikon) with an ISO of two hundred and a shutter speed of one/eightieth of a 2nd. Depending on the mild, this gave me a range of aperture values among round f/14-22. I selected 1/eightieth of a 2nd since it changed into speedy sufficient for hand-retaining a 50mm lens, and the digital camera could then pick out the biggest aperture price viable, taking into consideration a terrific intensity of subject (variety of the bubble floor in consciousness). In brighter light, you will be able to select a fair faster shutter.

Go Forth and Experiment

bubbles, frozen bubbles, frozen bubble photography, how to, photography

Once you have got mastered the techniques, there are infinite ways to customize your frozen bubble pics. Think about deciding on a while of day based totally at the sun, either growing or putting, to get notable golden light and hints of solar for your background. Practice blowing and freezing bubbles and gathering numerous to feature in a unmarried photo. Or pick a particular element to function and focus on. You can be amazed at what you could create!

Catch up on the relaxation of our Top five roundup of Top 5 posts:

  • Top 5 Travel Photography Posts
  • Top 5 Informational Photography Posts
  • Top 5 Posts with Instant Inspiration Ideas for Photography
Want more great ideas?  Follow Boost Your Photography on Pinterest: Boost Your Photography

Boost Your Photography: Learn Your DSLR is now available from Amazon. Get the most out of your digicam with sensible recommendation about the technical and creative aspects of DSLR pictures a good way to have you taking lovely photographs proper away.