Sunday, August 30, 2020

Photography Article Fall Round Up|Photography Artist Statement

Just in time for Thanksgiving, it's the Fall Round Up: your one-stop spot for a look back at this fall's posts. Catch up on the previous round ups here:Spring and Summer.

Yes, Go Chasing Waterfalls

Musings:

  • Photography Is ... What is photography for you? Some thoughts about the importance of timing, patience, and luck.
  • Boost Your Photography: Set a Goal or Challenge - Learn how setting, reviewing, and revising a photography goal or challenge can help move you forward in your photography.
  • Photography Gifts for the Holidays and Where to Order Holiday Photography Gifts - Put your photography to good use this holiday season. Read about the wide variety of ways you can use your images to create memorable gifts for friends and family.
A collage mug is one of many ways you can use your photography for gifts.

For Beginners:

Explanations and overviews geared towards those wanting to get more out of their photography. Many of the 'Tips and Tricks' and 'Inspired Ideas' are also applicable.

  • Aperture and the F-Stop Conundrum - Confused about aperture? This article is the place to start. The rest of this mini-series divides the aperture section into three:What an Aperture of F/1.8 Can Do for You,The Middle Range Apertures: f/8 and f/11, andWhat an Aperture of F/22 Can Do for You.
  • Camera Lenses: What's In a Name? - An overview of camera lens naming conventions and what you need to know when looking for a new lens,Learn Your Lens: the lens itself - All about the functions and features of a lens, and Learn Your Lens: the accessories - Learn which camera lens accessories you need and how to use them.
  • Yes, You Need a 50 mm Lens - Find out why a 50 mm lens is a great upgrade, especially from your kit lens(es), and it's a great steal, priced around $100.
Comparison of changing apertures from the wide, middle, and narrow ends of the spectrum.

Tips and Tricks:

Advice for getting the most of your camera and photography

  • Zooming vs. Cropping: perspective in photography - Understand the differences between zooming vs. your lens, cropping afterwards, and the importance of changing your perspective.
  • Easy Photography Upgrade: get a remote shutter release - Around $6 for a remote can make a big impact in your photography.
  • Shoot a Successful Self-Portrait - Learn how to shoot a better selfie: how to focus and set the scene as well as a variety of ideas to try.
  • Improve your Fall Photography: use a polarizer - Get those blue skies you've always wanted. Learn how to use a circular polarizer.
  • Panning in Photography - Learn how to create panning shots with a frozen main subject and moving background.
  • Thankful ... for Food Photography - A collection of tips and tricks for improving your food photography shots.

Inspired Ideas:

How to make the shot with specific photography ideas

  • 50th Post and Six Month Blogoversary - Count down the Top 5 Most-Viewed Posts of the first 50
  • Make the Shot: Slow Sync Photography - Get a behind-the-scenes explanation of how to create your own ghostly images using the slow sync function of your on-camera flash.
  • Yes, Go Chasing Waterfalls - Suggestions and advice for what to bring and how best to shoot waterfalls with that long, silky water look.
  • Local Tourism: Photograph the Harvest - Find photographic inspiration in your local harvest. Visit a pick-your-own orchard or pumpkin patch.

Travel Photography

  • Photography Collections: start a collection - Consider a collage as a way to display travel memories. Unify your collage by focusing on a specific item or element, like full doors, door knobs, or even hearts.
  • Window on the World - Windows are a unique way of placing the viewer within the frame of your photograph. Consider paying attention to windows when you travel.

Stay Connected:

Don't miss a single post from Boost Your Photography

  • Follow along onFacebook -www.facebook.com/BoostYourPhotography.
  • Follow along onGoogle+ -Boost Your Photography on Google+ (or click the 'Follow' button near the top of the right-hand column.)
  • Follow along onTwitter -@archaeofrog .
  • Sign up to receive each new post by email. (The subscription box is in the right-hand column. Email addresses will never be sold or distributed.)
  • Subscribe using your favorite RSS reader. (Click the 'subscribe now' button in the right-hand column or typewww.boostyourphotography.com into your RSS reader.)

Saturday, August 29, 2020

Photography Article Dramatically Improve Your Photography for Less than $20|Photography Artist Statement

Improving your pictures does now not require upgrading to a brand new digital camera frame or shopping for that fancy lens you've got had your eye on. There are lots of small investments that you may make as a way to have a massive payoff inside the satisfactory and range of your images. This article highlights a few inexpensive purchases that you may make to provide your images a short increase.

Dramatically Improve Your Photography for Less than $20 | Boost Your Photography

Get a Background

Take a trip to your nearest school supply or big box store, and you will find tri-fold boards that remind you of your Science Fair days. A white tri-fold board makes an excellent background for high key or product shots, allowing you to get a bright, all-white background. You can also use it as a reflector, to bounce light back onto your subject. A black tri-fold board can be used for low key shots or to provide an all-black background for darker, moodier images. Just a few dollars gives you a multipurpose tool that provides a lot of new options for your photography. Read more in Easy Photography Upgrade: the tri-fold board.

A white tri-fold board makes a great high key background.
A black tri-fold board makes a dramatic low key background.

Get a Pack

Scrapbook paper comes in 12 inch squares with a wide variety of colors and patterns. You can get a pack of different patterns and colors or just a handful of single sheets at any craft or scrapbook supply store. These can be used as background or settings for smaller objects and can be used to create patterns or designs when shooting oil and water or water drop shots.

Scrapbook paper makes a great background for product photography.
Oil and water photographed above the same piece of scrapbook paper.

Get a Remote

A remote shutter release gives you a new range of flexibility when using your camera. A remote is particularly useful if you want to get in front of the camera, as it allows you to focus and then take pictures of yourself easily. A remote is also a useful tool in combination with a tripod. A remote lets you trigger the camera without touching it or adding potential motion to your still shot. Read more in Easy Photography Upgrade: get a remote shutter release.

Finally, a far flung is the quality manner to make use of the ?Bulb? Mode to your camera. 30 seconds is regularly the longest set shutter speed alternative on a digicam, but bulb mode lets you hold the shutter open for an indefinite amount of time. Look for a far flung that has an choice to hold the cause button depressed. Bulb mode is beneficial for any lengthy exposure scenario, along with mild trails, big name trails, or photographs of slow, silky water and waterfalls.

45-second image captured using a far flung release. Read extra approximately Waterfall Photography.

This photo is to be had for purchase.

Get Closer

Macro or close-up photography lets you explore the tiny details of the world around you. While dedicated macro lenses cost hundreds of dollars, a small investment can lead you to macro-level results. Read about Macro and Close-Up Photography Tips and Tricks for advice about how to get the most out of your investment.

Close-up lenses are filters that screw on in your current lens. They act like a magnifying glass and assist you to get toward your situation than your lens? Everyday minimum focusing distance. Read extra about close-up lenses right here. A set of four close-up lenses are available on Amazon for less than fifteen dollars.

Snowflakes captured with a +4 and +10 close-up lens on a 50 mm lens.

A opposite ring allows you to mount your digicam lens on backwards for near-up results. You can study extra approximately opposite ring mount adapters here. Purchase a reverse ring that fits your digital camera model as well as the diameter (width) of the lens you need to opposite.

Extension tubes mount between your lens and the digicam, changing the minimal focusing distance and permitting your digicam?S sensor to record information over a much smaller concern. A complete description of the usage of extension tubes can be located here. Generic metallic extension tubes are bought in sets of 3 and fee much less than fifteen greenbacks, while specialized tubes preserve the electric connections together with your camera?S frame and cost over $a hundred.

Can't determine between the three? Read extra on Cheap and Easy Macro: comparisons and recommendations.

Get Reflective

Reflections can really add something to a photograph, and a mirror is an inexpensive item that can provide endless photographic opportunities. You can find large mirrors at a very low cost at your local craft or hobby store – they are often sold near candles to create a decorative centerpiece. I have a 12-inch round, frameless mirror that I use frequently in photos that I purchased for about $8 at a hobby store. I have been considering going back for a larger version, to make it easier to avoid having the edge of the mirror appear in the image, but the 12-inch size provides reasonable coverage without being bulky.

Candles contemplated in a mirror.

Get Around

Want something fun and different to play with in your photography? A crystal ball is a great prop for creative and unusual photographs. There are several sizes of crystal balls available easily online. The 50 mm and 80 mm sizes work well for photography. The 50 mm size is more portable, while the 80 mm size (pictured below) is a bit larger and easier to use for more encompassing scenes.

Flowering tree photographed thru a crystal ball. (Image rotated a hundred and eighty ranges.)

Get Light

A reflector can make a big impact on your portrait and close-up photography. 5-in-1 reflectors give you a variety of options to use when bouncing and diffusing light. Reflectors are useful in both indoor and outdoor lighting situations and can help balance light in the scene. These reflectors are also compact and portable, folding down into a bag smaller than a salad plate. 5-in-1 reflectors start at around $15.

Water drops on a CD. White reflector used to balance light from the window.

Get Stable

A tripod opens up many new avenues in your photography. Freeing yourself from the camera allows you to take better self portraits (read more about How to Shoot a Successful Self-Portrait ). A tripod also gives you the flexibility to shoot photographs with longer shutter speeds. See examples in the article on What an Aperture of F/22 Can Do for You.

GorillaPod is a brand of flexible travel tripods that provides the functionality of a tripod in a convenient, portable size. A GorillaPod can be used as a traditional, three-legged, tripod, but it can also be wrapped around bars, fences, or posts for an unusual point of view. A GorillaPod is small enough to fit in a larger purse or camera bag and comes with an inexpensive price tag. Entry-level GorillaPods for point-and-shoot cameras start under $20, and the larger version for supporting DSLR cameras start around $30. Read more about How to Maximize Your Tripod or Product Review: GorillaPod Tripod.

This photo was serious about my DSLR on a GorillaPod wrapped around a steel spoke.

Summary: Inexpensive Photography Upgrades

You do not need to spend a lot of money to greatly increase the quality and variety of your photographs. Basic backgrounds, using tri-fold boards or scrapbook paper packs, can add variety and simplicity to your images. A remote shutter release will get you out from behind your camera and provide the ability to take sharp, crisp pictures and long exposures, even beyond 30 seconds. There are several inexpensive options to get you started with close-up and macro photography, including close-up lenses, reverse rings, and extension tubes.

A mirror or reflected surface is an smooth way to play with reflections, even as a crystal ball can do greater than inform your fortune. A reflector can pass you ahead on your portrait photography and improve the light in your close-up photographs. Finally, a tripod is an crucial investment, and a journey tripod, just like the GorillaPod, is a wonderful manner to get the functionality of a tripod at a convenient price and transportable length.

So many alternatives! What will you do first to enhance your photography?

Want more great ideas?  Follow Boost Your Photography on Pinterest: Boost Your Photography

Photography Article Guest Post: Sun Flare and Starbursts|Photography Artist Statement

Jump on over to Digital Photography School to study a guest publish that I even have written on Using Sun Flares and Starbursts to Create Stunning Images.

Here's another example to get you commenced:

Sun Flare created with a Late Fall Sun

Photography Article All about Bokeh|Photography Artist Statement

Bokeh is a Japanese term utilized in photography to describe the out-of-consciousness areas of an picture and is often created deliberately for artistic effect. There are several factors that influence the appearance and impact of bokeh in an picture, and this newsletter will discover the ones elements and provide you with recommendation about the way to first-class attain the 'bokeh appearance' with the device you have already got. The 2d article on this collection will introduce the concept of 'fashioned bokeh' and explain the way to control the shape and layout of background bokeh.

Creating Bokeh: Aperture

In order to create bokeh, you need to have a section of your image that is outside the depth of field (the area of the photograph in focus), and this area is generally in the background, rather than the foreground, of your composition. The narrower your depth of field, the easier it is to create bokeh in the background.

There are several approaches to create a slim intensity of discipline. The easiest manner is to shoot at a reasonably wide aperture, including f/1.8. The wider the aperture cost, the narrower the intensity of discipline, and the thinner the section of the photo this is in attention, the extra of the heritage that becomes out-of-awareness. Opening your lens as much as its maximum aperture can even create a 'smoother' appearance to the history and bokeh.

Bokeh created by means of putting daylight bouncing off the water.

One reason for the popularity of the 'nifty 50' or 50mm lenses is their capability to obtain an aperture of f/1.8 for a noticeably low price for a digicam lens. (50mm starter lenses are to be had from Canon for $110 and from Nikon for $110. Read greater in Yes, You Need a 50mm Lens.) At f/1.8 with these lenses, the background bokeh will become vibrant circles of light. As you close up down your lens and slender the aperture, but, the form of the heritage bokeh changes, based at the number of blades within the lens. The Canon 50mm f/1.8 lens has five blades, this means that that the bokeh becomes pentagonal at slim apertures.

Foreground and history snow bokeh. The pentagonal form resulted from the 50mm lens at f/6.Three.

If you do not have a 50mm lens and as an alternative have handiest the lens or lenses that got here with your digital camera, then it's far possibly the widest aperture you could acquire will be between f/three.Five and f/5.6, relying on your focal length. You can still achieve a bokeh effect at those apertures, but you may want to use additional techniques to do so.

Other Strategies for Creating Bokeh

You can improve the blur of your background bokeh in other ways. Increasing the distance between your subject and the background will improve the bokeh. The closer the background is to your subject, the more likely it is to fall within the depth of field or just outside. As you move your subject farther away from the background, however, the increased distance will make it more likely that the background will fall outside of the area in focus.

Violets from above at f/5.6. Minimal blur and bokeh due to closeness of background.
Violet from the side at f/5.6. Greatly increased blur and bokeh due to distance to background.

You also can enhance the history bokeh by getting towards your problem. Even in case you keep the aperture the equal, the relative width of the intensity of area will slender as you approach your concern. Moving the point of interest nearer as your challenge movements nearer additionally makes the background rather farther away. You can do that by means of shifting physically closer in on your situation or by means of the use of a zoom lens and zooming in for a closer in view of your difficulty.

The collection of snap shots below demonstrates the difference that the position of cognizance could make on the form and size of the bokeh. As the location in awareness actions farther and farther away from the digicam, the bright bokeh mild circles come to be smaller and smaller. By the lowest proper photograph, the tiny vacation lighting are now absolutely in consciousness and no longer developing bokeh.

For this bokeh-stuffed portrait, below, the situation turned into located fairly near the digicam (about five toes) with the heritage significantly farther away (approximately fifteen to 20 ft). The pop-up flash at the digital camera become used to light up the concern, at the same time as an extended shutter speed (zero.6 seconds) supplied the brightness within the bokeh lighting fixtures.

Bokeh-licious Portrait by Archaeofrog on Flickr

You can combine those two suggestions (closer challenge and farther background) to reap bokeh in spite of a point-and-shoot digicam. If you use the macro putting (the tulip symbol), get in close to your subject, and preserve the heritage farther back, you may be able to gain a few measure of beautiful historical past blur and bokeh.

Point-and-Shoot Bokeh (Canon A4000IS)

Improving the Quality of Your Bokeh

Certain backgrounds lend themselves to better bokeh effects than others. Bokeh is all about light, and the more light you have reflecting or shining off objects in the background, the better your camera will be able to render the blurred, bokeh look. Point sources of light work particularly well for bokeh, as each point source can be rendered as an individual, bright circle of out-of-focus light. (Read more about point sources of light in my guest post on Digital Photography School: Using Sun Flares and Starbursts to Create Stunning Images.)

Holiday mild, street lighting, or even car headlights are famous choices for brilliant, bokeh-crammed backgrounds at night. Try the usage of a combination of all 3 techniques above to capture the look you need. Start with your widest aperture after which see how converting the distance among the digital camera and the concern and changing the distance among the situation and the background changes the final look of your image.

Christmas decoration with bokeh. Ornament turned into held barely in the front of tree

to increase background distance and create better bokeh.

You also can create bokeh during the day. Light filtering through trees and leaves can make appealing bokeh. You will get better results in advance inside the morning or later in the afternoon, while the solar is decrease inside the sky. These lengthy, vibrant rays and sundry shadows can create an thrilling framework to apply for growing bokeh.

Backlit bokeh from the afternoon solar

Color and mainly contrasting colours are some other vital issue to consider. If you really want to create a completely unique or memorable appearance the usage of bokeh, try to discover or create a state of affairs wherein the historical past bokeh is a contrasting colour to your predominant problem. This will similarly intensify the variations among the situation and the background and help make your problem 'pop.'

The vibrant oranges of the foreground leaves contrast with the blues and veggies of the background.

Bokeh Summary

Bokeh is a great photography effect and one that can add a unique and memorable twist to your images. While bokeh often begins with aperture, you should also pay attention to your distances: zoom in to create more blur, get closer to your subject to narrow the depth of field, or move your subject farther away from the background to be sure that it falls out of focus. Find some bright lights or bright sun and see what you can create!

Friday, August 28, 2020

Photography Article Shaped Bokeh|Photography Artist Statement

The first article on this series delivered you to All approximately Bokeh, and this second one will cowl the topic of fashioned bokeh. Shaped bokeh takes the idea of bokeh one step further through remodeling those out-of-focus circles of light into some other shape, with countless possibilities.

How to Create Shaped Bokeh: Supplies

This classic how-to publish for formed bokeh comes from DIY Photography, and it is enormously easy and inexpensive. (For the non-crafty among us, you may now also buy a Bokeh Masters package, created with the aid of them, for $25 USD.)

How to Create Easy Shaped Bokeh | Boost Your Photography

For supplies you may need the following:

  • A piece of black paper (thicker cardstock works best)
  • A rubber band
  • A piece of tape
  • Scissors
  • A 50mm lens

Seriously, that is sincerely it. An x-acto knife is beneficial for making the definitely small cuts, but I did my first few with a ordinary pair of scissors. You may also use a fashioned hollow puncher, if you wish.

The steps, you could basically intuit from looking on the photograph above. Cut out a duration of black cardstock, roll it round your lens to make a tube, and tape it together. Trace around the circumference of your lens/tube. Cut out that circle, adding approximately a half of inch or so all the manner around. Then, cut a chain of notches into the circle (returned to the authentic, traced circle). Fold the notches returned. You can then vicinity the circle over your lens and the tube and stable it in vicinity with a rubber band across the tube and the folded down notches.

Example shapes: superstar, snowflake, and coronary heart

But yes, we skipped the most important step: the shape. First, decide what shape you want for your shaped bokeh filter. For an introductory 50mm kit lens, you can make your shape up about 17mm long. (Here's the article on the math behind that, if you are curious.) Center your shape directly in the middle of the circle (fold the circle in half in two places if you want to easily find the exact center). All sorts of shapes can work, as long as you can easily and neatly cut it out at that small of a size. (The complicated-looking snowflake was cut using an x-acto knife.)

Shooting Shaped Bokeh

Now which you are well-armed together with your formed bokeh-making tube and filter out(s), you're geared up to begin taking pictures. Many of the ideas are the same as while shooting any type of bokeh. You will need to shoot with your lens extensive open (the widest aperture to be had, like f/1.8). You will want to have your challenge fairly near the digicam and the background at least two times as far away. You will need a historical past so as to render massive, circular bokeh, which is why the vacation season is an ideal time for shaped bokeh. Hang up a few strands of lighting fixtures or move stand in front of your neighbor's tree or house, if you choose.

The simplest manner to shoot formed bokeh is to compose your shot earlier than placing the form in front of your lens. A tripod is mainly helpful so that you can consciousness in your subject first and then transfer your lens into manual awareness, so that it will lock the point of interest in place. Then you could positioned the form over your lens, secure the rubber band, and now not have to worry about your camera trying to find focus via the narrow shape.

Keep in mind that your shaped bokeh will grow to be being a great deal smaller than the unique bokeh circles. Unless you're able to reduce your form to precisely the maximum allowable size, you will lose a number of the size based totally on how small you have got made your shape. The handiest compositional distinction between the two pics below is that the shaped bokeh clear out became used for the second one. The distances between the difficulty, the digicam, and the background (a lit Christmas tree) remained the same.

Another issue with using a formed bokeh clear out is that it'll further reduce down on the quantity of mild reaching your sensor. Because you may already be capturing together with your aperture huge open, you may want to use an extended shutter pace or growth the ISO to compensate. (Another purpose a tripod is reachable.) You can also want to don't forget the usage of a flash to better remove darkness from your situation. The background will no longer need the flash, when you consider that it's far already shiny and manufactured from lights. With the Chimay photographs above, the shutter pace improved from 1/eighth of a 2d for the circle bokeh to 2 seconds for the shaped bokeh. No flash became used.

For the snowman shot, under, the digital camera's integrated flash became used to light up the snowman. The standard settings for the shot were ISO 100, f/1.Eight, and six seconds. The bits of formed bokeh snowflakes creeping around the snowman had been a end result of my lack of ability to maintain him perfectly constant for the overall six seconds. A steady challenge (or some thing to preserve your subject consistent) also can be beneficial.

Snowman and a subject of Snow-Bokeh

Experiment with specific distances, each among the camera and the problem and between the situation and the history. The collection of snap shots below demonstrates the impact of moving closer or farther far from the history. Moving toward the historical past will lead to less overlap among your shapes, but you'll have much less of the shapes, as much less lights are on your composition. Moving farther far from the historical past will purpose a lot more overlap of the shapes and there could be plenty more of them.

The two pix above display the effect of transferring the concern (and the aircraft of recognition) in the direction of the digicam. In each pix, the camera and heritage stayed inside the equal location, whilst the plane of attention moved a foot or so in the direction of the camera for the second picture. Moving the plane of recognition that a lot closer to the digital camera additionally led to an increase in the size of the bokeh shapes.

Summary

Shaped bokeh is a a laugh and clean manner to make creative snap shots. There are endless possibilities, and you could effortlessly make new bokeh filters in a remember of mins. What higher way to have a good time and percentage the matters you adore?

Have a favorite formed bokeh shot you've taken? Share it inside the feedback beneath!

Photography Article How to Photograph Outdoor Holiday Lights|Photography Artist Statement

'Tis the season, at the least here in the US, for domestic proprietors to brightly festoon their homes in full-size quantities of small, twinkling lighting. Whether you recollect them Christmas lighting fixtures, vacation lighting fixtures, or just a a laugh excuse to run up the power bill, this article will surrender the hints you need to take excellent shots of outdoor holiday lighting fixtures and mild shows.

holiday lights, Christmas lights, photography, how to

Equipment

A tripod is a should for tack-sharp night time photos, and a far flung shutter launch is useful. (If you do not have a faraway, you can use the 2-2nd or 10-2nd countdown characteristic in your camera. Corded remotes, but, are sincerely cheaper and worth the few bucks to choose up. Read greater approximately them here.) You can use a point-and-shoot digicam on night or long publicity settings, but you may have the maximum control over the final picture if you shoot with a DSLR camera.

Settings

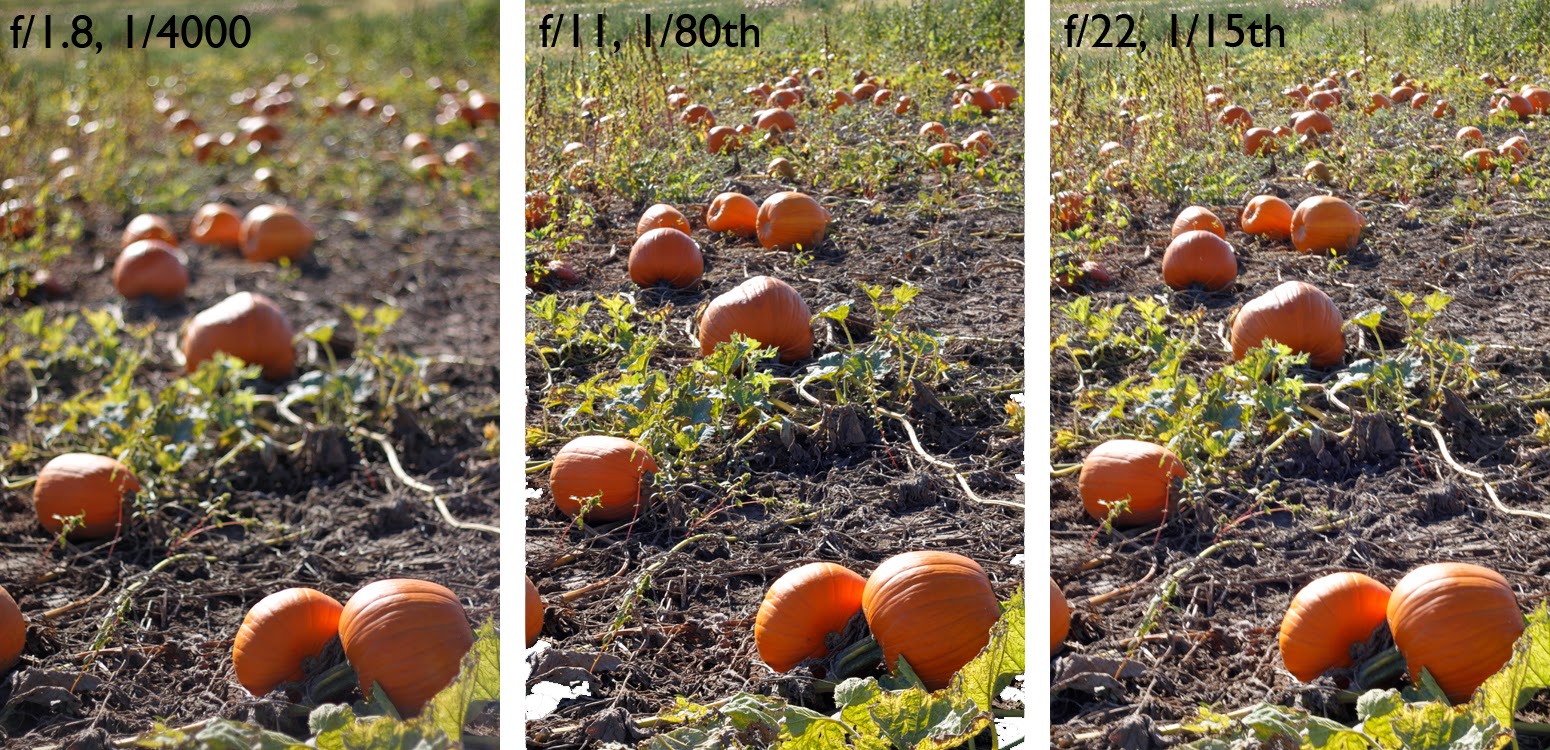
I choose to shoot holiday lights in aperture precedence mode at ISO 100 with a slim aperture, like f/22. This can create a starburst effect, turning every tiny light right into a miniature megastar. (Read more approximately how to create starbursts in my visitor submit over at Digital Photography School.) Even in case you do not get full starbursts for every light, f/22 will assist accentuate the glow.

I actually have determined that Christmas lights regularly appearance exceptional when shot a bit underexposed, as you still want some thing of a 'night time' look to the very last image and do not want your digicam's sensor picking a shutter speed in an effort to make the complete image appearance as vibrant as day. To that stop, I suggest using exposure repayment and underexposing your photo by one complete stop. (You can discover the way to try this on most factor-and-shoot cameras if you appearance deeply enough into the menus.)

The different alternative is to shoot bracketed and have the digicam take a sequence of images at extraordinary exposure repayment values. If you are the usage of this selection, I advise beginning with the values of -2, -1, and 0. This will give you a range of options to pick out from later.

Use Exposure Compensation to Get the Perfect Look for Your Holiday Lights | Boost Your Photography

Finally, you could want to don't forget taking your white stability (WB) off of Auto. If you shoot in RAW (or RAW jpg), then you may go away the WB on Auto and select the look you like fine in put up-processing. If you shoot in only JPEG, however, I endorse converting your white stability to tungsten or fluorescent. These will keep the skies blue, render the colors in the lighting as it should be, and no longer add a warm yellow or daytime glow to your snap shots. You may additionally need to shoot a series of pix at exclusive white balances after which determine. The set of pictures beneath had been shot consecutively the usage of a tripod, and the white stability changed into the best variable changed. You can see that the tungsten and fluorescent settings hold the snow and the houses white, whilst the opposite settings impart a yellow-orange glow to a great deal of the scene.

Watch Your White Balance with Holiday Lights | Boost Your Photography
Comparison of White Balance (click on right here to peer large model on Flickr)

Timing

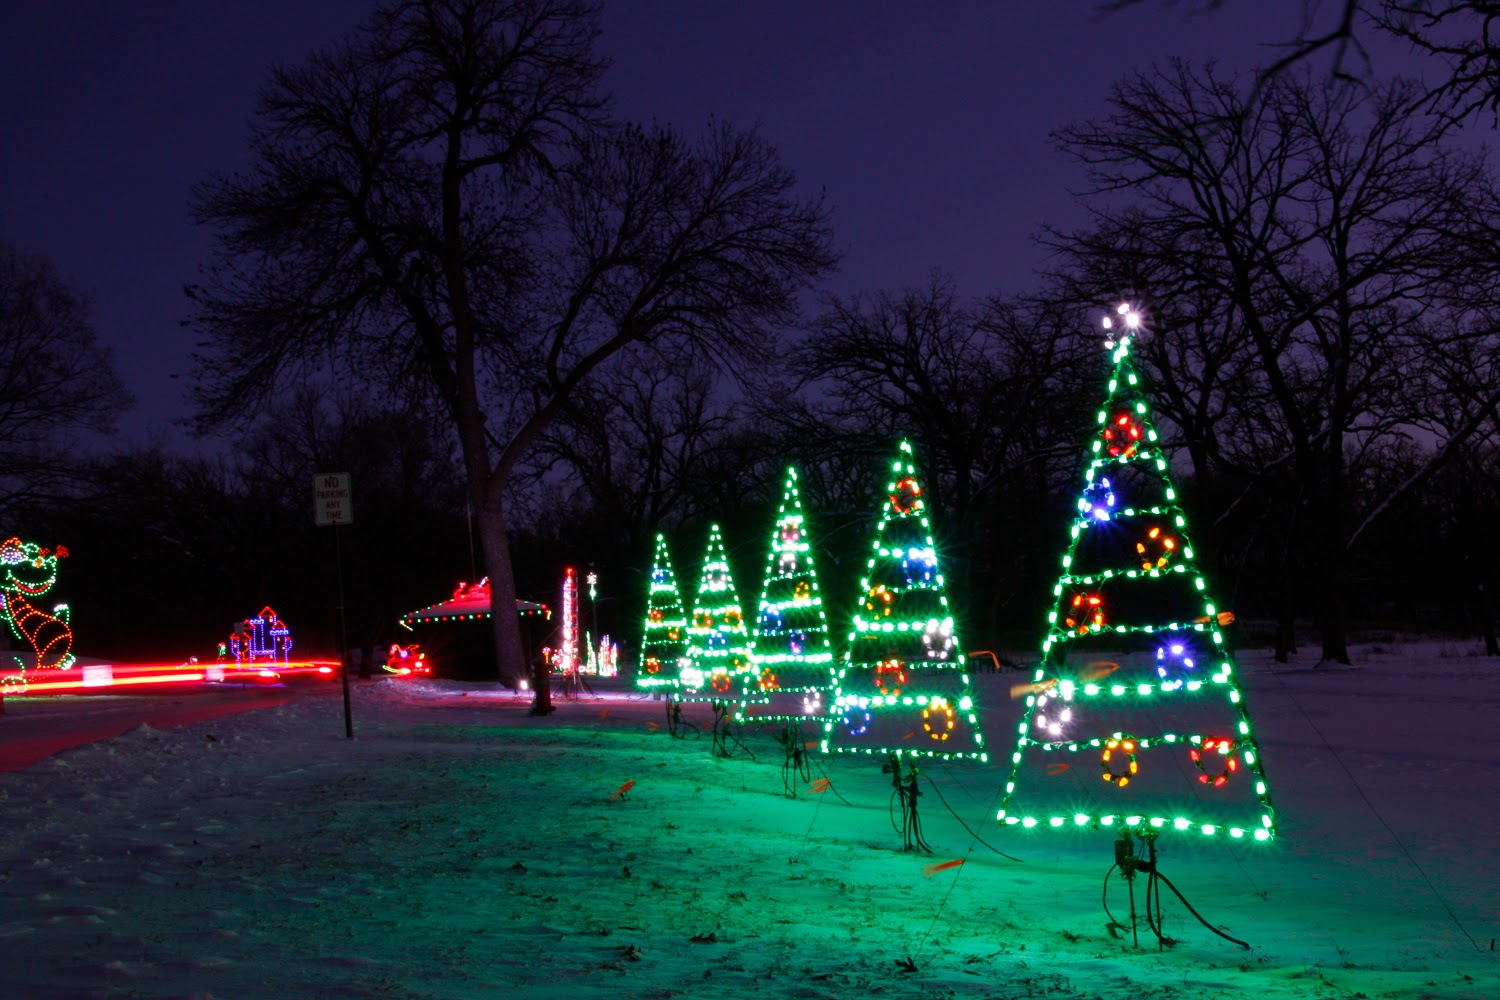
Timing is the whole thing for making it an iconic vacation lighting shot and now not just every other photograph. The key is to take your snap shots for the duration of the blue hour. The blue hour is the period of time (lasting about an hour) that happens shortly before the sun starts offevolved to rise in the morning and soon after the solar has set at night time. During the blue hour, the sky becomes a deep blue color that serves as an excellent evaluation to the glow of Christmas lighting. Your digicam will see a document this blue coloration deeply and extra vibrantly than it may seem in your eyes, so that you can preserve capturing even after the sky has started out to look 'black' to you.

Plan to Shoot Holiday Lights during the Blue Hour | Boost Your Photography
These pictures were taken handiest 15 minutes apart.

You also want to try and shoot at some stage in a night with clear skies. A clean sky permits for that deep blue colour, unfiltered. Scattered clouds make for superb sunsets however now not for first rate blue skies. A absolutely overcast sky will genuinely appearance pretty a bit yellow or orange, as it will reflect returned the light pollutants from any surrounding towns or urban areas. The other advantage of clean skies is which you might also be able to report stars, moon, or planets at the side of your holiday lighting fixtures.

holiday lights, Christmas lights, photography, how to, blue hour

There are many easy ways to figure out your timing for such shots. You can use a site like Blue Hour Site to get approximate timings for the blue hour in your area, or you can use a site like Time and Date or the Photographers' Ephemeris to determine the sunrise and sunset times. I have found that 15-20 minutes after sunset is the beginning of the best time for shooting holiday lights against stunning blue skies.

Composition

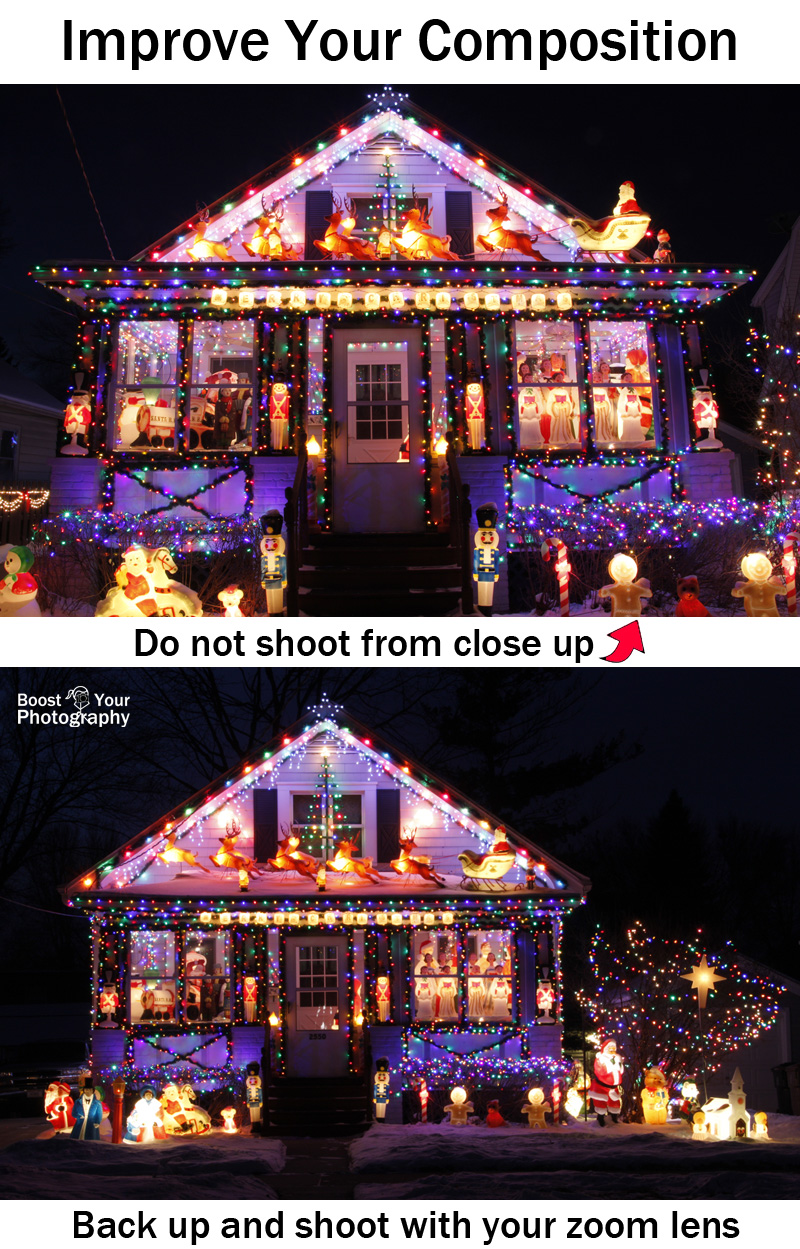
There are an endless quantity of approaches to photo and display off Christmas and excursion lights. The most conventional, of path, could be a straight on or simply off-focused architecturally pushed technique, wherein you encompass the complete house and are shooting from tripod or eye-degree. If you want the partitions of your house to appear instantly, take the picture from farther away (like throughout the street) and zoom in on the house. This will keep away from the distortion common in structure if you are too close to the constructing you're capturing.

You can also go for a less traditional look. Rather than such as the whole house, pick a particular phase or vicinity of hobby. Narrowing down the point of interest helps the viewer to look and admire all the information gift inside the scene, which might be misplaced in a broader composition.

holiday lights, Christmas lights, photography, how to, Santa, church

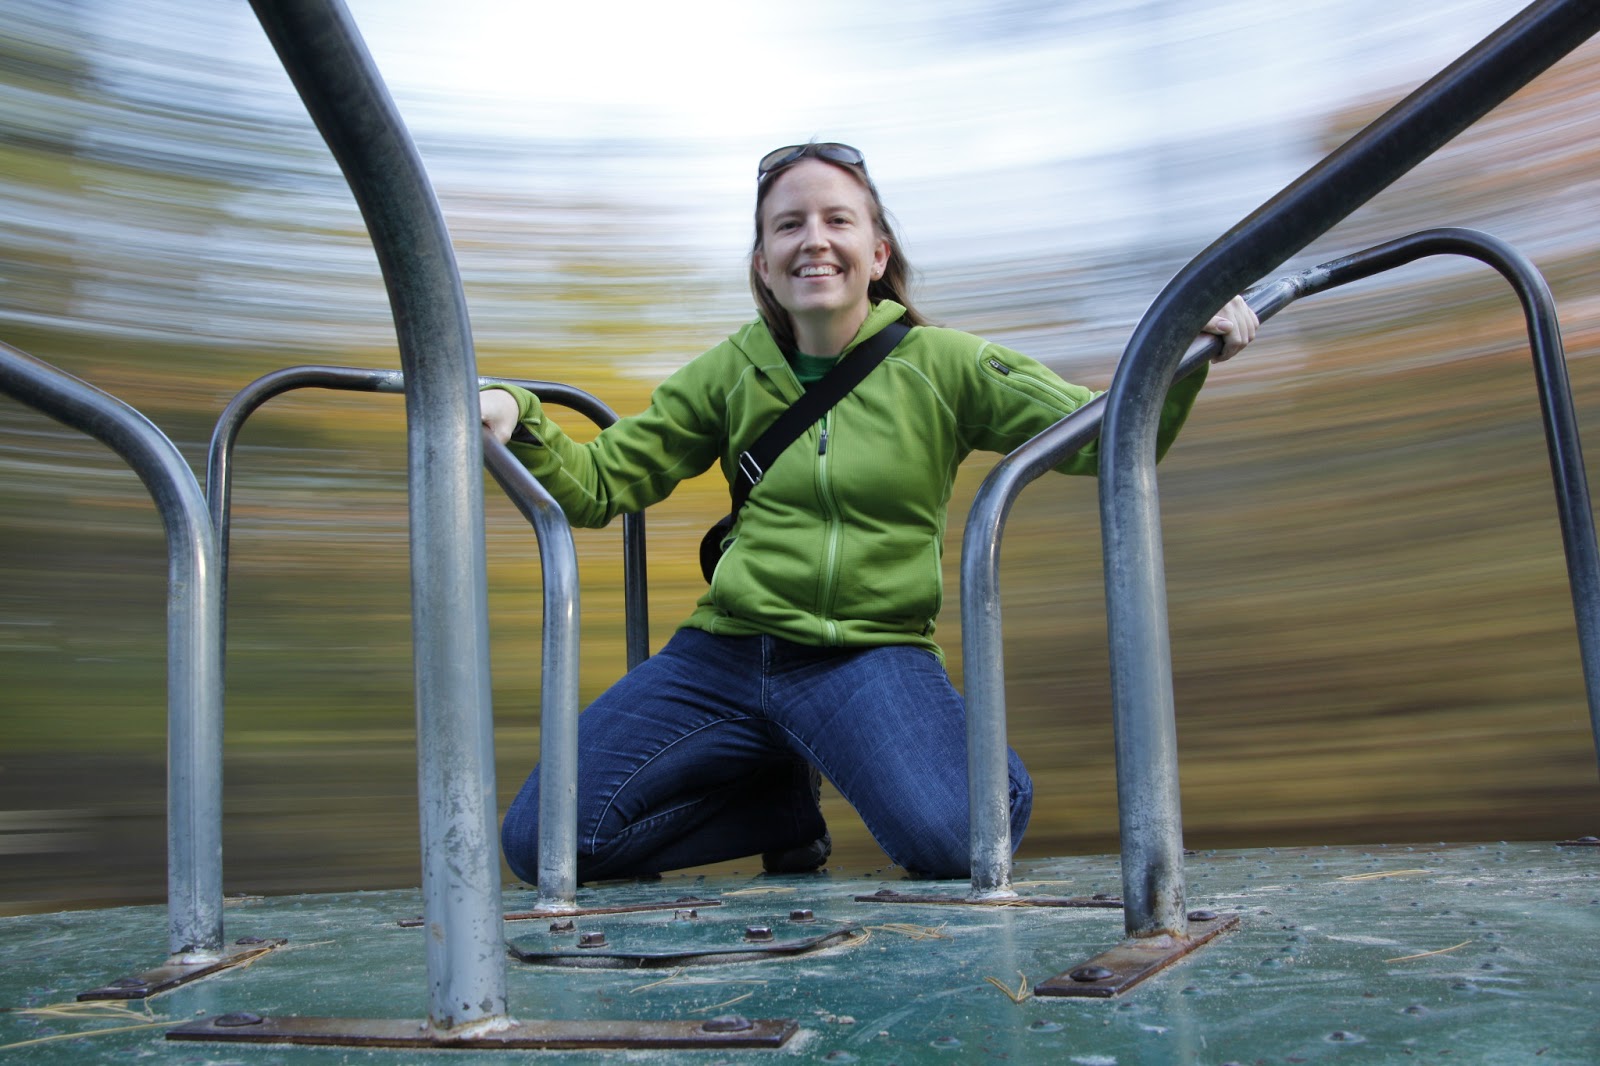
Think approximately adding other styles of lighting into the shot as properly. For homes on busier streets, you could need to shoot a much broader factor of view and consist of the mild trails of passing cars. These more lights will upload interest and a experience of movement to the image.

holiday lights, Christmas lights, photography, how to

Finishing Touches for Houses

If you really want an above-and-beyond Christmas or vacation lighting fixtures shot, there are a few finishing touches in terms of lights and lighting fixtures. (A sparkling dusting of snow is continually favored too.) If you want your own home to look warm and welcoming, you should switch on the interior lighting in order that the home windows glow brightly. This additionally applies to porch lighting or street lamps. Their warm sparkling will upload to the general atmosphere of the very last photo.

Here the storage lighting are too vibrant, but the indoors lighting fixtures add a warm glow.

Consider, however, turning off or temporarily disabling any flood lights or movement sensor lights that do not add to the overall composition. Flood lighting fixtures lights a house may add to the holiday impact, however shiny movement lighting streaming out out of your storage will simplest blow out within the photograph and make everything too brilliant, as in the photo above.

These appear to be nit-picky sorts of matters, but, as you could see from the examples, they could make a large impact on your standard photo.

Summary

Christmas and holiday lights are a photographic gold mine this time of year. If you take a bit bit of time to plan out your shot (shoot during the blue hour, turn on the interior lights, and produce alongside your tripod and far off), you'll locate it clean to seize memorable and delightful photographs of your favorite lighting presentations. Enjoy!

Boost Your Photography: Learn Your DSLR is now to be had from Amazon. Get the maximum out of your digital camera with realistic advice approximately the technical and innovative factors of DSLR photography that will have you ever taking lovely images right away.